Pages

Search This Blog

Saturday, December 8, 2012

Big Tangles Zendala

Wow!  I just looked at when I last posted, it has been too long.  I have to do better.  I will try to get myself back in the groove of blogging.  I have been working away, but I haven't been sharing with you readers. I am sorry.

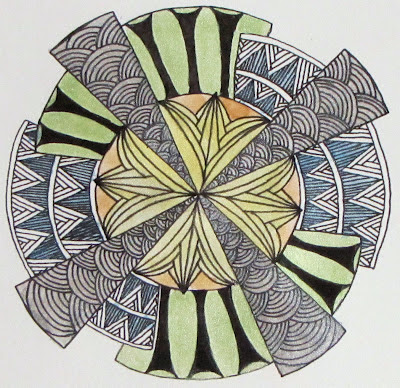
I am back to share with you my Zendala that I finally got finished this week.  It took me all week to get it done. Not because it was very detailed, but I haven't been sitting down to work like I should.  When I first saw the template from Erin in this week's challenge, I thought "Oh, a flower! This will be easy."  Then as typical for zentangle, where I thought I would go, was not where I ended.  My tangles are all large, they use the whole section.  I really like that about this zendala.  It isn't very floral either.  And, this one is spare.  I decided to leave some white space and I'm glad that I did.  It looks great.

I'm calling this one Biggen Zendala as the tangles are all so big.  I used Gryst by Frances Banks for the first time.  It's the one there in the middle.  I used a variation.  I have to say that I first thought Gryst was going to be simple, and it isn't complicated, but I did have to sit and work out which way my lines were going to go.  The first way or two I tried did not come out right at all.  I don't have the name of the second tangle noted so if you know, please leave it in the comments.  I could go look it up but as it is after midnight, I'll skip it for now.  I then did Paradox around the outer edge.  I love the depth that it brings to the spaces and how it really sets off the "petals".  I liked it so much that I opted to leave them white.  

This zendala is done on an 8" circle.  A friend of mine introduced me to a circle cutter from Martha Stewart's craft line that I really like.  It will cut a 4" circle up to 12".  It is really easy to use but you definitely want a cutting board underneath.  Just ask my card table with a nice circle shape carved in it.  OOPS!  Anyway, it's available everywhere.  I used one of my Michaels coupons to get mine.  This is the first zendala that I have done in a circle and it was fun.  I was tempted to further cut it into a octagon but I was able to stop myself.

Well, I have a long day ahead of me and it starts early in the morning so I better go.  I'll work on getting updates here more often.  I hope you are having a great day!


Tuesday, October 30, 2012

Bunzo for Sandy

The storm has passed us by here in Delaware.  Luckily for us, we suffered nothing worse than a large branch down.  We didn't lose power or anything.  The weather closed school and work yesterday so I took advantage of the day and tangled.

The Diva's challenge was to use the newly released Bunzo.  I like this pattern but I see that I could do with some more exploration.  Like Allium, I have trouble keeping this pattern small.  Maybe I should challenge myself again and try for a tighter design.  Here is what I came up with.

 I just jumped in with Bunzo.  As I was working on it, Bunzo reminded me of Wirlz so naturally, I needed to use Wirlz.  Thing is, I just couldn't stop once I got going with the Wirlz.  I think they look nice together.

Sunday night I was playing with some Gelly pens and gave Bunzo a try with those.  I used pink and pink glitter to make this on some scrap paper.  I wanted to see what the design would look like with some variations in color.  It's fun if nothing else.

Along with the challenge I worked on ornaments.  I have them listed in my etsy and have sold some at the craft fairs I have been doing.  Several friends have placed some orders as gifts so I have been working on them when the mood takes me.  Lucky they are fun to make.  I have been making Zendalas with the snowflake shape but yesterday I thought, "Why not use Auraknot?"  So, I traced out the shape to make sure where I wanted my lines to go.  Once I had that figured out, I was off.  The center here is Fife with one step left out.  The second X in the center is too squished to use on the ornaments so I have been leaving it off.  It reminds me of a Poinsettia.  The ornament in the photo is unfinished here but is an example of how I spent the day.

I hope that all of you who were in the path of Sandy fared well.  Those who might be getting the snow from this crazy storm, I hope that you are warm.  The numbers coming out of West Virginia are crazy.  I'm continuing to be thankful that the storm was not worse for us and thinking of those who are still dealing with the after effects.  It will take a while to clean up after this I think.

Thanks to the Diva for making time for the challenge this week.  I hope that Artoo is feeling better and you are able to get some rest.  Hugs for you all.  I am thinking of you.

Sunday, October 28, 2012

Stripes 2.0

Over at the Diva's blog, the challenge this week is to use stripes as a string.  I have used this several times since the challenge was first posted last year.  Using stripes can be fun and makes for a good visual.  This time, I made my design large, I used an 8" square piece of watercolor paper and added red as a pop of color.

I added the challenge of red just to see what I could do with it, use it more as an accent rather than just drawing my patterns in red.  In all it came out pretty good I think.

Thanks to the Diva for another great challenge.  I'm sticking to a short post this week as we are looking at Hurricane Sandy to start effecting us soon and I wanted to get this out before we lost power.  Luckily, we are inland.  Water and wind will still be of concern, but we won't have to contend with the storm surge.

Stay safe everyone and have a great week!

Thursday, October 11, 2012

Halloween Zendala: It's webtastic!

It is fall here in Delaware.  The nights are cold and the days are cooler.  The leaves have started to change.  It's a good time.  This week at the Bright Owl, the zendala challenge is a Halloween/Fall theme.  I was all excited as I eventually want to have a zendala themed for each season.  However, as Zentangle often goes, this zendala didn't turn out the way I thought it would.  Rather than fall, I have Halloween zendala.  I really like it though.

Halloween Zentangle
I started this zendala on an 8X8" piece of watercolor paper.  I then took an AquaStic in orange and colored the background orange.  I kept the color uneven and unplanned.  I thought of the outer ovals as the eyes of a mask.  I even started to blacken them all in but I thought that all of them being black would be too much.  I added Verve and Allium to the center to mimic a spooky eye.  Afterglo and Web came eaily at the larger triangle spots.  After that however, I was stuck.  I had this large shape in the middle and could not think of what to fill the space with.  This morning Auraknot jumped up and said "Use ME!" so I did, bringing Web back to the center to tie it back to the edges.  The shading really added to the dimension in this one.

I hope you all have a wonderful fall and Halloween.  As of today, my sons want to be a Teenage Mutaint Ninja Turtle and a Korean Pop star.  Funny that the turtle costume will be the easiest to do...

Tuesday, October 2, 2012

Note Cards for Christmas

Now that I've decided to do the art show thing, I am always trying to think of things that not only will people like, but what they might like to buy.  With the holiday season quickly approaching, I thought maybe Christmas cards.  I designed a card last year to use as my own personal card and I got nice feedback from friends and family.


So, as I had one design already done, I made up two more so that I can offer a few options to potential buyers.  For the first one, I used Mi2 as the back ground.  I used a red micron to make the "seeds" and the centers of the pattern.
Christmas Tree Card
I have found that making the card large works better when going to get it printed.  The original was drawn on a note card, but it leaves extra space at the top and bottom.  Making the design 5X7" seems to work better.

For the next design, I wanted to have a card with words on it.  My handwriting/lettering is not very good so I designed a card that I could have words printed in the space.  I used Huggy Bear as the back ground here, and red and green micron pens.  I left the center of the card blank.  When I uploaded the card, I was able to add the Season's Greetings.  It came out pretty well and I'm glad it did as I wasn't sure what I would do if I couldn't make it work.  

I scanned both images with my new scanner and am really happy with how they came out.  The shading turns out well and when reprinted, they look good.  Having the images printed on matte 100 lb card stock, they come out pretty close to the original drawings.  There are a few little tweaks that I would do differently next time, but nothing that interferes with how happy I am with how these turned out.

While I know you are all quite able to make your own cards, these are in my etsy shop should you like to skip the step of having your own made.

Thanks for stopping by and checking out my work.  I'd love to hear what you have to say.

The Challenge of Sankegg

Finally!  Things have settled down enough that I can get back to the Diva's weekly challenge.  I have stopped in to see what was going on each week, but have not been able to get myself sat down and put pen to paper.  Since September, I have been doing some shows and fairs in the attempt to get my art out there.  It has been a learning experience to be sure.  I'm still working on finding my audience but I'm getting there.

I have not tried Sankegg before.  I really like the look of it, but I'm not sure that I have it down very well yet.  See I have this thing with evenness, in that I get a little twitchy if things aren't even.  But, in the spirit of Zentangle, I just went with the pattern and let go of my twitches.  After just doing a quick pencil try on a scrap paper, I jumped in with both feet.  I had to refer to the step out often, I kept getting confused, but I think I got it down.

Sankegg Challenge


I knew that I wanted to put Sankegg in several places in the tile.  Nothing like a use my tangle challenge to play with variation.  After making my string, I started in the center and went with Sankegg as in the step out.  I ended up adding Tipple around the Sankegg in the upper left side mostly to cover my mistakes.  I somehow ended up with too many lines but through in a few circles, and BOOM, no more extra lines.  For the lower right side, I decided I wanted to try varying the triangles.  I stopped short of shading Sankegg as I just wasn't sure where to start.  I'll work on shading it next time.

Have a great week everyone!  Thanks for stopping by.

PS:  I got a new scanner, an Epson Perfection V33.  The above image was scanned using the scanner.  Isn't it lovely?  It's scanned in at 600 dpi and no touch up was made.  A very sweet and affordable scanner if you're looking for one.

Wednesday, August 22, 2012

Verve Experiments

Once I started making Verve, I can't seem to quit!  Thanks to Linda over at Tangle Patterns, I've been seeing Verve in a new way.  Linda used Verve in a way I had not imagined and it inspired me.  One of the things I love about sharing patterns with other Tanglers is that patterns are used/created differently by everyone.  Variations can be wildly different but so can basic technique and I love seeing all the different approaches.

Taking my inspiration from Linda, I created this piece that I am calling Tempest.  I started with the darkened line first.  It is a filled in Organza without any embellishment. I had thought I would go back and add to it later but I changed my mind.  Then I added Verve behind it.  In making Verve, I played with waving the lines more and varying the circles to see what would happen.  I have to confess, this is probably one of my most favorite pieces and it's basically a monotangle.  Anyway, it was a lot of fun to do and I wanted to share it.

Another thing that I have been trying to do with Verve it to find a way to connect circles one to another.  I'm still working on it but I have done it a bit.  In some places it is very Verve and then other bits it begins to look more like Auraknot.  I think that you can see it a little in this Illuminated Letter I made.  You can see it along the top.  Like I said, a work in progress but I like how it looks.  I did a Vortex-like bit in the circles there.

While there is more Verve to show, I'll just add one more image to this post.  I wanted to give myself a challenge to use tangles in long, narrow pieces and see what I could come up with.  I did a similar idea on an ATC and thought I'd take it a little larger.  This one is on a 6" x 6" square.  I also used some tangles that I haven't before and was plesantly surprised with how they came out.  Coaster for example.  I have not used it before.  Why? I have no idea.  I really like it and have seen it lots of places but I never tried it until then.  

Well, I have had a long day of prepping for the Arden Fair and I am about to fall asleep sitting here.  Thanks for stopping by and have a great week!

Saturday, August 18, 2012

Catching up on my Zendala Dare!

I've been busy and haven't taken the time to blog out my entries into the Zendala Dare by Erin.  I'll post this entry to Dare #18 even though it also has zendalas from Dare #19 attached.  Please forgive me.  Things won't settle down around here for a few more weeks, and I fear that if I try and wait until then, I'll never get these up.

Curiosity Zendala
OK, Dare 18.  I have to say that when I first looked at this pattern, I thought that I would do something floral and then this came out instead.  I love when my pen decides to do it's own thing.  I'm calling this Curiosity Zendala in honor of the landing on Mars.  The patterns here made me think of vortexes and worm holes and space travel.  My 11 year old son and I stayed up and watched the feed from NASA on the day the rover landed on Mars and I have to say that it was an incredible thing to witness.  If you haven't seen the video of what was done you should.  It is quite an amazing thing that the teams at NASA did.  I am so glad that I stayed up to see it happen, even if it cost me some sleep.

I think that I'll try my hand at this template again and see if I can't get something floral to come out on the second go around.

Cancer Awareness Zendala
Dare 17 was a personal one for me and for many others as it seems.  My Mother died of Acute myelogenous leukemia (AML) in 2006.  My Father has battled prostate cancer as has my Uncle and Grandfather.  Luckily, all were treated successfully.  So, for this template, I played up the ribbons in the design.

I first drew the background pattern of Bales and the edge of Ramykin and then made a photocopy of the basic design onto watercolor paper.  Using watercolor pencils, I colored the ribbons to remember those I know with cancer.  The Blue is for prostate cancer, pink for breast, (My God Mother died of breast cancer, my aunt battled it and I have a friend fighting now.) orange for leukemia and lavender for all cancers.  The lavender is more pink that I would like but no matter. After painting the ribbons, I shaded the design.

Awareness Zendala
I then went back to the original. I decided to keep it simple and let the ribbons stand proud.  I added red hearts in the center of the Bales as a reminder of/for those we know who battle cancer.  Leaving the ribbons plain, I also thought that it would be a zendala that could be for awareness of any/all diseases our loved ones face.

I have one more zendala to share with you all before I end this post.  I made a donation to Erin's team and received the Thank You gift of even more zendala templates.  They are all really wonderful and I can't wait to get pen to paper and explore them more.  One of the templates however really spoke to me and I sat down and got started right away.  My final piece is really quite simple and I love it so much!  I am calling it Spring Zendala.  For the first time I wish that I had the coloring skills that so many of you have as the desire to add green here is almost overwhelming.  I'll keep it as is though.
Spring Zendala
I hope you all have a great week ahead and thank you for stopping by, taking a look, and leaving a comment if you'd like.

(I totally see now, that the spring zendala is turned the wrong way. I love however that it doesn't matter!)

Assunta and Mooka

This week I was able to sneak in the challenge from the Diva.  I have been checking in each week, but haven't always had the time to get to either doing it or completing the challenge.  As Mooka is a tangle that vexes me, I thought that I'd spend a moment on this challenge and actually finish.

My Mooka isn't always even and sometimes looks just down right goofy.  This challenge however, has me trying out Mooka on every little bit of paper I have time to doodle on.  I feel better now about Mooka.  It's still a little more wonky than I would like but it is better than I have done in the past.

This is a short entry as I have a few more that I would like to do tonight.  I hope that you had a great week.  Thanks for stopping by!

Tuesday, July 31, 2012

Floral Zendala

When I started this week's zendala dare, flowers were not on my mind.  Yet, that is where I ended up.  A few dares back, I used Hi-C's in the center of my zendala and wanted to use it again.  To me, when Hi-C's is turned outward rather than inward, it looks like a lily.  Now that I have this big lily in the center, I wanted to keep up with flowers and nature.

I used a variation of Versa and opted to fill in the space because I was in the mood for some black.  The other side is Fife.  I wanted there to still be black behind the pattern, but I wanted some contrast to the Versa.  Around the boarder is my variation on Chainlea by Norma Burnell.  When I get a moment, I'll step it out for anyone who may like to see it.  I couldn't think of a pattern that I wanted to use in the open spaces so I took that as a sign that I should leave it as is.

This post is short as my boys keep coming in here to see if I'm finished with the computer yet.  Plus, I need to get working on this week's Diva challenge also brought to us by the wonderful Erin.

Have a great day and thanks so much for stopping by!

Monday, July 23, 2012

Mi2!

This week the challenge is to use the tangle pattern Mi2 created by CTZ Mimi Lempart.  I really love this tangle pattern.  It looks so complicated yet is very easy.  The spacing is the hardest part for me.  I confess, I draw a grid to help me get started.  Without that my "seeds" would be all over the place but once I have them drawn, I am no longer following a grid.

I used Mi2 in an Illuminated Letter that I made for friends so I have a little but of experience with this pattern.  I haven't used it very often since then, so it was nice to have another go at it.  I wasn't sure where I was going when I got this tile started.  I drew Mi2 in the center and then decided what to do next.  I wanted the pattern to stand proud in the tile, so I didn't draw a string.  After I finished that, I decided to surround it with Verve, my latest pattern.  I have been playing with it and wanted to explore it some more.

I really like this one and it was a lot of fun to make.  I have to say, this is probably the fastest tile I've done in a while.  Thanks Laura for a great challenge.  I am glad to hear that you had a good time in Philly.

Have a great week everyone!  I can't wait to see what you've created!

Gift Zendala

This week I must have had Christmas on my mind.  I have been working on ornaments for the up coming craft show that I will be in so maybe that's why.  Anyway, this week Erin has given us rectangles in a circle.  I was unsure what I was going to do and was clicking through a few entries when I came to Maria Copetas beautiful zendala.  Someone commented how her designs looked like gifts and I had my idea.

I used red and green micron pens and pencil shading on this one.  I kept the shading to a minimum, just separating the layers and not shading the patterns.  Wrapping paper doesn't usually have much dimension so I didn't feel the need to shad much.

This was another fun challenge.  I've started looking forward to Friday's and a new zendala.  Thanks Erin for another great one!

Monday, July 16, 2012

Nosegay Zendala

This week the template at The Bright Owl was a doozy for me.  At first I was totally stumped on what to do with all those circles and half circles.  I almost skipped this one but I stopped myself.  Then I decided to just jump in and do something rather than sit and look at the outlines anymore.  Sometimes just starting is my biggest stumbling block.  But you can't finish if you never start, so I bit the bullet and put pen to paper.


After making 12 different choices on a test page, I opted to start with Arc Flower.  Then I decided that rather than filling the lower circles with tangles, I would give lines a try.  As I went along, I decided that the result looked rather like nosegays.  Then I needed to choose another flower for the other 6 circles.  I just made one up after a few doodles.  I say that I made it up, but it very well may already be a design already.  I then drew lines to make the nosegay "holder" for that flower.  I decided to just shade the spaces between rather than making it too busy.

I like this one but it seems a little unfinished to me.  It must be however, as I can't think of anything else to do to the design.

Thanks Erin, for this week's template.  It was a challenge for me all right.  I had to stretch my mind for this one and I'm glad that I did.

Monday, July 9, 2012

Auraknot Challenge

At last!  I am back to the Diva's Challenge.  I have been too busy to finish or do the challenge for a little bit now and I am glad to be back at it.

Auraknot.  I must confess, I was intimidated by this tangle pattern.  It has so many steps and looks so complicated but I am glad I bit the bullet and tried it for this challenge.  I have to say, I found it MUCH easier than it looks.  I must also confess, that my star shape was traced from a cookie cutter.  A big part of my fear of this pattern is the beginning outline.  Starting with the outline done really helped me a lot.  I think that I can do it without one next time.

Now that my confessions are over, I have to say that I am looking forward to using this again.  I think that Auraknot will be a lot of fun to use.  Creating this tile went quickly, aside from kid interruptions that is.
This one was done on a 6"X6" watercolor paper square.  I found these at Dick Blick on Sunday and I HAD to buy some.  I am not good a cutting a straight line so finding these was very exciting.  They also have them in 8"X8" size.  Whoo Hoo!  The final size is more around 4" though.  I want to take it and see if I can find frames and mats that these would fit into.

After getting Auraknot finished, I added the tangles around the out side.  Please ignore the tangle on the lower right.  It was to be one tangle but I messed it up so horribly, that i just had to flub my way through.  It doesn't look too bad but still...

Thanks for stopping by and I can't wait to see what everyone else has done!

Tangle Pattern: Verve

Back in Zendala Challenge #9, I came up with a new pattern that I am calling Verve.  I must credit my Husband with coming up with the name.  I was stuck and asked for his help.  I asked him to tell me what word or name comes to mind when he saw that design and he said "Verve".  I'm not really sure that it visually embodies the definition of the word, but it works for me.  :)


The pattern is really quite simple and will easily fit into a circle shape that pops up in your string.  I have been toying with it in some other designs that I have been working on.  I have tried to carry the pattern into a line if you will.  I'm still working on it but I am enjoying the process.

I start with a 6 and a 9 that wrap around the circle.  You can "wave" the stems quite a bit to add interest.  I have just been shading where the lines "tuck" into each other but I imagine that shading where the lines bend will add some more dimension to the look as well.  Also, the center circle can be filled in with anything you'd like or just left empty.

I hope that you like this one.  It has been a lot of fun for me.  I confess, I have to fight myself to keep from filling every rounded space with this one.

Playing with Paper: Zendala Challenge

I like to use watercolor paper when I create my Zengangles and my Zentangle inspired drawings.  It is as close as I could find at the local craft store to the original tiles that you buy from Zentangle.com.  But in all honesty, it is the paper I chose to use first before I had any tiles from Zentangle and now, it is the paper that I prefer.  I like how it shades as well as takes the ink from the micro pens.  Despite this, I was excited at the added challenge from Erin to use different paper in the challenge this week.

After reading the challenge, I decided that I was going to use origami paper.  I love origami paper.  I think that it is beautiful.  However, I didn't have any.  So, I loaded up the kids and we went to the store.  If you've ever looked at origami paper, you'll know that there is a lot to choose from.  So many colors and patterns!  It was a bit over whelming.  Plus, I didn't need a lot of it.  Let's face it.  I will not be trying the beautiful art of origami.  I get type A about some things, but I don't think that I can be as precise as the folding requires.

I know! Zentangle like!
But, I digress.  While flipping though the paper I cam across paper that jumped out at me.  The black and white patterns said "HEY ZENTANGLE!" to me.  They are quite inspirational these little squares.  I think that I may hang up some in my studio or use them as background paper to display some of my Zentangles.  One thing I learned though is that that these patters are wonderful but they do not make great background to draw on.  I find that they compete with the eye against the drawing.  If I had to do it over, I would choose some larger patterns or some that are only color.  I also used Sakura Gelly Roll pens for the drawing.  I figured that the larger lines would help.  You'll have to be the judge on that though.  The origami paper also doesn't shade as well as watercolor paper.

Without further comment, I present my tries at the challenge.  I made three on the origami paper.  One in red, one in orange and one in black.


Again, I enjoyed the challenge.  I really love the paper that I found. But I don't think that together, they were successful.  Thanks Erin for another great Zendala template.  I really like this one.  So much that I am making yet another go at this template.  This time it is on a 12" X 12" canvas and using paint pen.  When I get it finished, I'll get a photo up.

Hope everyone has a great week!

Tuesday, July 3, 2012

Summer Zendala

Well, I'm back.  It has been a little while since I posted anything.  Summer, the kids out of school and vacation in the Adirondacks has kept me from the computer.  That does not mean that I haven't been busy though.

I am in a mad dash to get work ready for a neighborhood craft fair, The Arden Fair, that happens on September 1st.  I love this fair so much.  It is up the street from my house and is really wonderful.  For the very first time, I will be an exhibitor rather than just a visitor.  So, my pen has been busy, busy.

But, you are here to see this week's Zendala challenge.  This challenge was a lot of fun I have to say.  At first I was a bit stymied as to how I was going to get started but once I decided to use Brayd, I had my "theme" and I went from there.  This is the first time I have used Brayd in a circle and I have to say, I'm quite happy with how it turned out.
Brayd, Featherfall, Raindotty, Fescu, Beeline, Arc Flower
I did the center with Arc Flower next and then the Featherfall.  I didn't stay in the lines with these two so I wanted to get their uneven edges done first.  This is my first real go at Featherfall.  It came out pretty good but no where near as good as some of you do it.  I have to keep trying it and get better at it.  That being said, I do like it here.  Keeping with "natural" tangles, I chose Beeline, Raindotty and Fescu to finish it out.

I am really thrilled with how this one came out.  The shading really added a lot of depth to it and well, I just couldn't be happier.  I am going to see if I can get art prints made up for the fair.

Now, a late entry into Challenge 11.  I had this one drawn in time but held of shading it.  I was trying to work out some ideas that I had but then I changed my mind and went back and shaded it this week.
This one was all line work.  I just couldn't think of a way to get tangles into this one.  There is good space, I used the large size template, but I was just out of ideas.  I think it was because I had vacation on my mind.

I do like it.  I am calling it "Trippy Zendala" as it looks more like a visual test than the usual zendala.

I wish I could think of more ways to add some shading here.  I think more could be done to play with the perspective but I'm stuck.  I don't want to go overboard so I stopped while I was ahead.

Thanks for stopping by and taking a look.  It has been very hot here and I'm sure where you are as well.  I do hope that you are all staying cool, or warm for those of you in the Southern Hemisphere, and are having a great day.

Tuesday, June 12, 2012

Drawing Day 2012

Last year I found out about Drawing Day and participated.  Luckily, I followed them on Twitter because that is how I was reminded about it again  this year.  I got my drawing done just in time to say I did it on Drawing Day but I failed to get it submitted in time to make it into the book.  No matter, I made it into last years book.

9X12 on watercolor paper drawn with Micron pen.
For this, I started with three circles and then added a string around them to divide the space.  After I added Knase to the upper right corner, I decided that I wanted to have black in the corners to give the edges some definition.  Hollibaugh was a natural choice to carry that down.  Knightsbridge and Crescent Moon, gave the same feeling but not quite as dark.

I am really pleased with how this one came out.  It was a very enjoyable way to spend a Saturday.

Zendala Dare #9

I have been so busy with the end of school that I have not been posting.  I have been working though and hope to get caught up soon.

So, on to the challenge from Erin this week.  This is the first pattern that Erin has created that has given me trouble.  I think it is because I didn't "see" a design when I first looked at it.  Often the idea for the design has come to my eye but not so this time.  I really love this template.  The shapes and design are really beautiful.  The ovals though... They were such a stumbling block for me.  I spent a lot of time just looking at this design and thinking about what tangles to use.  In the end, I opted to keep it with line work.  Once I made that decision, it wasn't any easier though.  I started with Braids (I think that's the right name.) and went from there.  In the end, I really love this Zendala.

The outer edge on the larger pieces is Ramy by Sandy Bartholomew from her book Totally Tangled.  The larger ovals in the center I just made up a pattern.  I wanted to mimic the Braids but not repeat it.  I was pleased with how it came out.  I'm not sure if there is another pattern like it already.  I'll have to think up a name and draw up the steps.  The small ovals at the center were done to bring Ramy back into the center.  I opted to edge out the center and spaces between the tangles and fill them in black. I am so glad that I did.  I saw the star shape in the center but I had not seen it on the outer edge until I filled it in.  I love how shapes hide sometimes.

Thank you Erin for doing this challenge each week.  Zendalas are quickly becoming a favorite of mine.  Your templates are wonderful.  When is your book coming out?  :)  I'd buy it.

Monday, May 28, 2012

Cabbage Rose Zendala

It is always amazing to me how Erin creates a template for the challenge each week and how different each person's work comes out.  This week, my zendala became a flower.  At first I wanted to make it into a budding peony but it came out more cabbage.  I'm calling it a cabbage rose.  It might be pushing it to add rose, but I'll see how far I can take it.  :)

This is a really simple zendala for me.  The tangle choices are few but this one didn't want to have a lot going on in it.  I really like it and the shading makes it interesting for me.

Not a lot to write this week as I have a FULL plate at the moment.  Lucky for you all.
Patterns: Fescu and Ixorus
One last thing, I finished shading the Sheriff's Zendala from last week's challenge.  Rather than update the original post, I'll just tack it on here.
Happy Memorial Day!  Have a great week.

Sunday, May 20, 2012

Starry, starry Zendala

This week Erin gave us the star treatment for the Zendala challenge.  I get excited to see what Erin has come up with each week and then I am surprised at what my mind's eye sees in the design.  In my first challenge I saw surfboards and in this challenge, I saw a sheriff's badge and gun.  I fought that idea at first though.  Guns and law enforcement are not exactly zen.  Know what I mean?

So, fighting the idea of guns, I went first to flowers.  I started in the center here and added Arc Flower to the circle. I put Knightsbridge in the center to give it a little more interest.  Next I did the points of the stars.  I was tempted with other patterns but I wanted to play with stripes.  I divided the point to give the stripes a little more interest.  I repeated Knightsbridge in the smaller circles for several reasons.  One, I wanted to repeat to tie it in with Arc Flower and the other was to bump up the graphic-ness of the zendala.  That left me with the beautiful scalloped section to work with.  I was stuck here as I wasn't sure what to use.  In the end, I kept it simple.  I divided it into sections and drew lines.  To my great surprise, the lines seemed to set the Knightsbridge circles off so I shaded them to further pop them up off the page.

I haven't gotten any of the round Zendala tiles yet.  I'm putting them on my wish list though. Maybe for my birthday this fall someone will surprise me.  I liked the idea of the circle so I just traced everything onto a piece of watercolor paper.

The whole time I was working on the Zendala above though, I could not get the badge and gun image from my mind.  So, I decided to just do one anyway.  I traced out the design on some drawing paper and went to work.  I looked at images of sheriff's badges on line to give me some ideas of what they look like.  Braided edges were often repeated so I used those.  I added a few lines to reinforce the star.  Then it was time for my gun.  I found out that the chamber of a gun is not usually decorated.  Not on the side that would be visible on this angle anyway.  I tried to make the circles look as if we were looking through the chamber of an unloaded pistol.  I haven't done any shading yet.  I may go back and add some.  The weather was so nice today that I went ahead and photographed this.

Thanks so much to Erin for creating these templates each week.  I don't know how you do them, but I am so very glad that you do.

Sepia Challenge

I am late! It was a busy week here.  School is out soon and there are lots of goings on that kept me away from  blogging.  I was able however, to squeeze in the challenge from The Diva.  I like using sepia markers for zentangle drawing.  I think that they can be just as zen as a black micron pen and maybe even more so, as the brown is easy on the eyes.  Well, mine anyway.

Since I'm late, I'll just cut right to the chase.
I have a set of sepia pens as well as the lighter brown one that you see here.  I kept it pretty simple using only the three tangles.  The bottom is my first try at the new tangle Pea-nuckle.  That deserves some more attention. I have the basics down but I tried to crowd it here.  I think I'm in need of a new 01 sepia micron too.  The top is Atorm.  I messed up in my initial grid so I had to do a variation instead.  The middle is Ticking.  I was playing with it a bit and trying to make it look like a bit of a stripe.  I don't think it looks like I hoped but I still like it.

I am looking forward to summer break.  Things will settle down a little, and that will be nice.  I will have to fight the kids for the desk top a bit but as Mom, I get to trump their game playing.  :)

Have a great week!

Thursday, May 17, 2012

Color in New Sizes

I am still exploring using watercolor with Zentangle.  I learn more each time and am finding this a lot of fun.  I have tried the standard 3.5" X 3.5" tile, Artist Trading cards, 5X7" and working on a 9X12 page.  Each size can present its own challenges and each brings a new experiment to learn.  The only constant that I find so far is that everything is different each time.

I think that I MIGHT have figured out how much paint is too much though.  On a few ATC that I painted over the weekend, I just dropped the watercolor on the wet card and let the paint flow where it may.  While producing a lovely effect, it left a lot of the watercolor on top of the paper.  Too much paint on the paper will disrupt the ink flow from the Micron pen.  The end of the pen, picks up the paint causing the ink to stop.  Good news is that you can write or wipe it off and the pen works fine again.  I think to finish a spot or two I will have to use a Sharpie Pen to finish.

Sometimes there are places on the ATC cards where the ink from the pen bleeds a bit.  I am not sure if this is how the ink flows on the watercolor paint, or if that the paper was wet changes how it accepts the ink.  The bleeding isn't bad though.  The line is a touch thicker and is darker in those spots.  My main concern with this however, was that the bleeding would pull the ink from my Micron faster than normal.  Then I remembered that I had a few older pens that didn't work as well any longer, they left skips and/or a lighter line, and wondered how they would work on these watercolor places.  I am happy to report that they work great!  It is almost like having a new pen. Plus I don't worry about those pens losing ink too fast.  I had already written them off but was keeping them around because I couldn't bear to part with them.  The old pens now have a home in my ATC kit that I am keeping in my purse.

Color Wash

This is the first ATC that I tried with watercolor.  Again, I just followed the paint as the string. The pattern on the left is a variation of Atorm.  I wanted to let that beautiful blue show through.  When I was photographing it, the light caught the pencil shading that I did and gives the photo a shine that isn't in the original.

I like these small sizes.  This one is done on a Bristol card.  I just bought some watercolor paper sizes that I have painted and will try ink on next.  I am interested to see if the ink will flow differently on the water color paper.

Aliens

Aliens was an experiment with less color on a page.  After I got all the lines drawn, it looked like some alien life forms.

Before I started playing with the ATC size, I started doing a 5X7" size.  I liked how it was going and was moving right along on it but then I got to a section and was stuck.  I couldn't decide if I wanted to add a tangle or not and if I did add one, I couldn'd decided on what pattern to put there. So, I set it aside and waited for an answer.


Last night I was trolling Pinterest for some inspiration and found Braids.   I love the flow of this pattern so much.  The site is in German though, so if you would like to read the great lesson that Simone Bischoff has posted I would recommend it. So, braids... This morning I flipped back to the 5X7" piece to see what new things, if any, it had to say.  I had braids in mind so I thought that I would try it in my trouble spot and see what happened.  I am sooo pleased to say, it worked great!
Color Study
The "steps" there are my try at Planateen that went terribly wrong.  I did it fine on my practice of the pattern, but once I put my pen to the paper, I lost my mind.  Luckily, I think that it came out ok despite my best effort to mess it up.  In this piece, I still used the color as a string, but wasn't as fussy about it.  I also drew on the white paper.  Some bits are more successful than others but on the whole, I like it.

Thanks to all of you for the great feedback that you have been giving me on this journey into color.  It helps so much.

Monday, May 14, 2012

Deco 'Dala

This week Erin at The Bright Owl created a Zendala template that reminded her of art deco design.  After I looked at it for a while, I had to agree.  I really do like the art deco style.  While it isn't a style that I would normally decorate with, I enjoy looking at examples and studying it.

I took the idea of art deco and tried to apply it to my Zendala.  I spent hours on Saturday looking at images on my computer trying to find patterns that I could adapt to the challenge.  In the end, I didn't create anything new but the top of the Empire State Building did give me some great ideas for the future. But, like my wanderings on the Internet, I digress.

Deco 'Dala in black and white
For this Zendala, I started in the middle.  I used Hi-C's here.  I really love Hi-C's because here it looks so art deco to me.  Here it looks like a lily, but if you put the pattern in back to back squares, it looks totally different.   It is a wonderful pattern because it looks so different in different places.  I used the arches on the triangle.  Does anyone know the name of this pattern in Zentangle?  It pops up a lot in art deco design.  I opted to keep the semi circle sections the same all across.  I just couldn't divide the space in a way that I liked.  I used a variation of Hibred.  It is kind of a blending of Hibred and Knase.  The black "columns" are a copy from an incredible art deco door I saw.  I wasn't sure that I liked them at first, but they came to grow on me.

After I got this Zendala done, I wanted to play with color a bit.  What I didn't want to do was to draw a second Zendala though.  I was really quite happy with what I had already done so I just kept it.  Taking some advise that Genevieve gave here at Amaryllis Creations, I photocopied the unshaded drawing onto watercolor paper.  I bought some inexpensive pearl watercolors a month ago and got them out to try.  I thought pearl would lend itself to art deco.  Lots of shiny in art deco.  :)

Deco 'Dala with watercolor

I used the silver, gold, blue, green and yellow pearl watercolor and added it right over the top of the photocopy.  The photocopy didn't smear or run with the water nor did it rub off with the brush.  After I finished painting, I let it dry for a few hours.  I noticed  that the black of the photocopy was not as dark as I now had a nice shimmer over the top.  I took my micron this morning, and went back over the lines were and the black popped out again.  I could have left it where it was but I wanted a blacker black.  I guess I ended up drawing the Zendala after all.

I hope you like them and welcome your comments and feedback.

Tuesday, May 8, 2012

More Mini Canvas!

It must be the warmer weather, a try at an etsy shop, or (most likely) the materials, but I am on fire lately.  I am full of inspiration and energy.  I Love it!

I have a few more mini canvas done and I wanted to share them with you.

Spring Walk
I am starting to learn that I cannot tangle the same way on the canvas as I do on paper.  The most obvious reason is that I am working with oil paint markers rather than a pen.  The tip is bigger on the paint marker so I need to "biggify" my tangles a bit so I have plenty of room.  Too small, and the paint can fill in the white space where I don't want it to go.  I know that I could always paint over a canvas that I don't like, but I don't want to do that if I don't have to.  What I like most/ and sometimes least about the bigger tangle, is that I really have to think about the structure of the tangle.  It have given me a new way of looking at the tangles themselves.  What kind of ways can I vary a pattern and still have it work and look good.  It is also teaching me that less is more.  Not every inch of the canvas needs to have paint on it.  Sometimes the negative areas can have the greatest voice.


Borders


 I really love the white lines that seem to sit atop tangles when people draw them in.  They run along the surface and bring such nice light to the tiles.  This was my attempt at those lines.  I'm still working on them being successful, but I think this one came out well.  It reminds me of the landscape from an airplane window.


Festoon
I call this one Festoon because the Purk looks like a jewelery bauble.  I had a lot of fun making this mini canvas.  I started it with the curved lines and Purk and then set it aside for a few days.  The grid pattern was going to be Versa but I didn't finish it all the way.  I guess it is still Versa.  To finish this one off, I went in with a white charcoal pencil to add "shade".  I kept the charcoal to a minimum and used a blending stump to smudge it and smooth the look.  I love this so much and I am certainly going to do more white on black.  I have a larger canvas that is calling out to me.  :)

Thanks for taking a look!

Do do do do Feeling Groovy!

It is a new month and a new tangle!  The Diva adds to the challenge on the first Monday of the month to try out a tangle that one of our fellow Zentangle enthusiasts has come up with.  This month the tangle is Groovy by Eden Hunt.  Check out her blog and the pattern here.  Since this tangle was posted to Tangle Patterns, I have admired Groovy but not had a chance to try it out so I was excited to see it as the tangle to use.

I must confess that I did not practice groovy before I started my tile.  I just jumped right in with both feet and let the lines fall where they may.  I am pretty sure that I didn't make groovy quite right but I am looking forward to getting better at it.  I really like this pattern.  The look of it is really quite lovely and it looks far more complex than it really is.

I used on of my watercolored tiles for this challenge.  I am still toying with this idea so I thought I'd work on the challenge of the color along with the challenge of the tangle.  To start, I penciled in my lines of groovy.  Sometimes my wavy lines take on a mind of their own, so I wanted to be able to erase any wild curves.  I think that my being so careful kept my curves too small.  Groovy wants to be a bit bigger than I made it I think.  There needs to be more space.  I don't dislike my attempt, but I did learn what I need to do differently next time.  I also learned a neat thing.  If I lightly erase over the watercolor, some of the color rubs off giving the color added variation.


Again, I used the color as the string.  This was a little of a challenge in a few spots as the color fades out and I sometimes stopped the pen before I should.  Stiricles makes an appearance in this tile.  Last week wasn't enough I guess.  As I wanted the color to be visible, I didn't black out where I normally would but used lines instead.  I like how it came out.

Thanks to Eden for a great tangle.  I really look forward to using Groovy in the future.  Thanks Laura for all you do for this challenge!

Saturday, May 5, 2012

Zendala Challenge

I'm a little late to the Zendala party that Erin is hosting over at The Bright Owl but I am glad I found my way there.  The Zentangle community is awash with Zendalas these days and everyone of them is incredible!  I have done a few and I have to say that I love them.  I'm always keeping my eye out for a new pattern to use.  I am NOT geometry inclined so creating my own is out. Thanks to Erin and her challenge, I can find a new pattern every week!

So, I am starting this challenge at week 4 and it comes with not just a pattern, but the added challenge of using the themes of sea and Mexico as well.  Erin is on a vacation cruise in Mexico so you can see where her inspiration came from.  (Totes jealous BTW).  So, let's jump right to it!

Bic Mark-It markers on Mini Canvas Panel
When I looked at the pattern, all I could see were surf boards.  The challenge of sea fit this nicely but then I wasn't sure how I was going to make surf boards.  All I could think of were flowers, so I chose some bright colors and went for it.  I'm not sure how "Mexico" this is though.  It seems a bit more Hawaii.

Thanks for taking a look!  I hope you are/had a great time on your trip Erin.  Thanks for the challenge.

Wednesday, May 2, 2012

Working with Color

Last month when I was working on an Illuminated Letter, I toyed with the idea of adding a water color wash to the piece to add just a little more to the design.  In the end I decided not to because you can't remove the color once it is there.  I still want to explore the idea some, but there are a few kinks for me to work out.  The most important is: I don't know anything about watercolor painting.  A pretty big hurdle don't you think?

The day that I bought watercolors, I spent an hour or so exploring them.  I wanted to see how the paint worked with the water and the brushes.  In the end, I had a sheet covered with brush strokes and puddles of color.  When I looked at the sheet by itself, it looked like just what it was, a test page, or maybe some of that "abstract" 1980's paintings that were popular in doctor's offices.  I didn't toss the paper though.  I figured that I could always use the back as a scribble spot for pens, practice space or whatever. 


This weekend, I decided to cut the page up into different sizes and tangle over the watercolor and see what happens.  It was fun.  The watercolor paper takes the ink a little differently but not in any obvious way.  The paint on the paper didn't seem to affect the micron at all.  I wondered if the paint would be picked up my the pen and cause a problem but it didn't. 


First try. Watercolor paper, watercolor, micron pen and pencil.
I started with 2 3.5" squares that I cut like a tile for Zentangle.  In the first one (left), I wasn't sure if I wanted to tangle over the paint or not.  Should I let the color stand alone or use it as a way to enhance the design?  In the end I did both.  I kept some patterns on the color, as if the color was the string.  On the left side, I drew a small string to determine the space, but chose not to cover the paint.  I really love how the variance in the paint color gives the tangles depth and light without shading.  After finishing, I went in with a B shading pencil and a blending stump and added in a little shade here and there.  The pencil shaded very nicely over the paint.  I didn't have to press as hard and the shade was more even. (It seemed so anyway.)


Second try
There was more color in the second tile, so there was no choosing where to draw.  This time, I let the colors be the string.  I used the B pencil again for shading and kept the shade to the patterns alone for the most part.  My favorite part of this tile is the way the orange and blue paints mix to create highlights.

Just in doing these two tiles, I already have ideas on how to paint the next time.  I don't think that I need to have a full page of paint.  I think having unpainted spots will be nice.  I also think blending dark colors into lighter ones will be a nice touch.  I have the whole first sheet I want to use first.  I am on a third and larger (5X7) and have found more fun things to try. 

This is a new direction for me and a fun one.  I am excited to see where it grows from here.  In the last few weeks, I have been really productive (for me) and these two tiles were finished really quick.  I'm not sure if it is my excitement for something new, the simplicity of the patterns, or maybe the both, but I surprised myself at how quickly they went.

Thanks for stopping by and taking a look. 


Tuesday, May 1, 2012

Trying on a new size

A long time ago I picked up some artist trading cards at the craft store.  At the time I didn't know what they were.  I just thought the little 2 ½ X 3 ½ inches cards were cute.  They also come in a variety of papers so I thought it would be a great way to try out paper without a big investment.  Last week I tucked a package into my purse along with a micron.  My thinking was that I could pull them out at work when/if I get caught up and need something to keep busy.  I am interrupted often at work so an ATC is great.  A smaller size gives me smaller sections to work on, so I can fill them quicker and not worry about forgetting where I was.

So far I have finished one and am halfway through another.  I love these little tiles because they are a great way to practice patterns, or try out new ideas.  I know people trade these with each other but I have no idea where.  If you would like to trade or can advise me where to post for trading, I would love to know!