Pages

Search This Blog

Saturday, October 19, 2013

Dot - Dot - Dot - Dot - Dot

This week the challenge that Laura put forward is Pointillism.  I confess that I have never tried this style of drawing before, or at least, not that I can remember.  I guess maybe I have as the tangle pattern Rain Dotty is pointillism.  However, I have not tried to create a whole piece of art using just this style.  I really focused on the method here.  Trying to play with the dots to show more depth in some areas while little in others.  I ended up doing two for this week.  First I used an older micron on a square of watercolor paper.  I followed Laura's example a bit and kept things non-tanglely at first but later added more defined pattern.  After I was done, I went back and added a little pencil for shade in a few spots. After I was finished, I found more to the tile than I thought there was.  Some of the sections, blend one into the other to create a curved look that I certainly didn't plan.  As my teacher in college would say, it was a "happy accident".

Next I was drawn to give this method a try on canvas.  I took a blank black canvas board I have and used white oil pen with a white charcoal pencil for shade.  This one was really abstract.  I just started tapping away over a minimum of pencil string and this is what I came up with.
It reminds me of a shoe.  I'm not sure why but it does.  I am pleased with how it turned out.  What is it? Who cares?  

I will certainly explore pointillism more and keep it in mind while working on my pieces.  

Monday, September 30, 2013

They Might Be Zentangled.

One of my favorite bands is They Might Be Giants.  I have loved the Johns and their music since college. Soon after my oldest son was born, TMBG came out with their first kids album, NO!, so I got to share their music with him.  TMBG and all of their albums have taken us on many a long car trip in musical agreement.

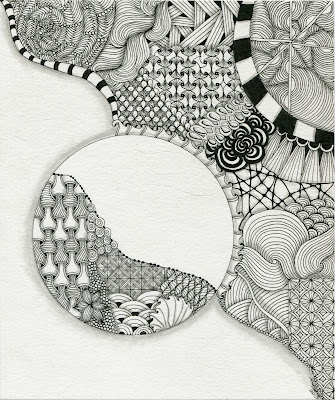
Recently, the band played in Philadelphia for a free show with WHYY.  The band played some new songs from their new album Nanobots but also many great classics that I have loved for years.  One of the songs they played was Ana Ng.  A great song that tells a great story but also has a line that says: "I don't want the world, I just want your half."  As the song was playing, I was inspired to try and create a ZIA inspired by that line.  It has been a while since I created a ZIA just for me so I thought that this would be a great one to do.

I don't want the world, I just want your half.


I started this one with just the circle and dividing lines drawn.  I didn't use a string to further divide, I just went with designs as they came to me and went from there.  This one is on watercolor paper and is 7.5" X 9". It is an odd size, but I wasn't thinking about that when I started.

Now to nerd out for a moment.  I have an instagram account (@TinkerTangles) where I post photos of my work as I go.  It is fun for me to share my process and sometimes, if I get stuck, seek out some feedback from others.  After I got the drawing done, I posted a snap of it and shortly went to bed.  When I woke the next morning I found a comment.  See that there, the one from they_might_be_giants?  That is from the band! Not gonna lie, I almost shouted with glee.  I'm a dork I know but that was so cool to see.  My 13 year old was pretty impressed.  TMBG is now one of his favorite bands as well, so he could share in my excitement.

I working on this drawing though, I learned a pretty important lesson.  DO NOT LEAVE ART SITTING ON THE FUTON!  I have a room in the house that I have taken over as my "studio".  It does double duty as the guest room as well, so there is a futon in there.  When guests aren't sleeping on it, the futon becomes a staging location for what I am doing.  It's covered with paper, paper cutter, bags from Michaels etc.  So, as my desk was full, I put the drawing on there while I worked on something else.  The cat managed to scrape his claws across it and marked the paper. You can see it in the image.  Luckily, I can remove the most visible marks in my photo program.  I am going to get a limited number of prints made of this so, removing those scratches is important to me.

So, lessons learned, art made.  I hope that you like this piece.  Leaving so much "empty" space is something that I usually don't do.  This one a fun one.  It holds a personal meaning to me and was a lot of fun to do.

Wanna hear the song that inspired this?  Check out this video:


Tuesday, September 24, 2013

Knights Over Tipple Challenge

The other day I realized that it has been 4 (!) months since my last blog post.  I really need to set time aside each week to sit and post something for those who visit here.  I won't promise that I will though.  Because I know me.  I will try, but I can't say I will.  I have been furiously working away however.

In the attempt to create an alphabet in tangles, I decided that I will try to use the Diva's Challenge each week as not only a challenge for Zentangle but as a double challenge to myself to work on an alphabet tile.  I am using some letter cookie cutters that a dear friend gave me long ago as my stencil.  I really love cookie cutters as stencils.  They come in all shapes and sizes and no printing is required.  Just set it where you'd like the design, trace the outline and get get started.

This week is the first in the (hopefully) future series of 26.  As M was at the top of the bucket, M is the kickoff letter.  The challenge is to use just two patterns on the tile.  Those tangles are Knightsbridge (a checkerboard pattern) and Tipple (circles).

I started with the M, using it as a string in this piece.  I drew out the boarder first.  I knew I wanted that to be Knightsbridge.  Then I tippled (is too a word) the M.  I thought about varying the center here and adding to the Knightsbridge but I decided that simple was the way to go.  After getting that done, I had this empty spot that I needed to put something in.  The blank paper was just too empty and didn't look right.  So after a mid morning trip to Starbucks and the Post Office, I came back to this.  With caffeine kicking, I decided to freehand some wonky lines for the Knightsbridge and then Tipple over the spaces.  Combining them to make a  Tipplebridge.  Tee hee!

Things were a bit busy there until I got some shading in to pop the M up from the background.  Here I only shaded around the M and again at the outer edge, separating the Tipple from the border.  In the end, I am happy how this turned out.  I wasn't sure that the final tile wouldn't look too busy, it still is.  With the shading however, the separate layers "stack" as it were, to make things easy to see.

I hope to sit and get some more posts in soon.  I have been working on Shrinky Dinks lately.  I have been using past Bright Owl challenges to make medallions for necklaces.  I have also been doing some rectangle pendants.  I debuted them at the local Arden Fair and the necklaces sold quite well.  So well, that I posted the remaining in my etsy shop.  I have made 4 more in the last few weeks and hope to have them completed soon.

So, have a great day all you out there!  I look forward to seeing what cool things you have come up with for this challenge.

Tuesday, May 14, 2013

Gray for Number 57

I am trying to post more to the Zendala and the Diva's challenges.  I had been doing really well but then I fell off for a while.  I had been putting my efforts into getting things done for Art and Craft fairs so that took up a bit of time.  Then winter set in and my creativity was sapped away by the dark and cold days.  So, with the warmer weather, my energy as returned and man, does it feel good.

In my trips to Michaels over the last several months, I have seen the toned gray and toned tan drawing tablets.  I think that the look on the colored papers is very beautiful.  Plus the addition of the white as a highlight really sets things off.  I've been thinking about trying it but I kept from putting it in my basket.  I didn't need another distraction AND I have a drawer full of paper already.  Really, how much paper do I need to horde?  This weekend however, armed with coupons and a search for supplies for a commission, I saw that the gray notebooks had been marked down.  So, of course I grabbed one.

Wanting to get back to the dare and using my gray paper, I decided to combine the two and see what happened.  I printed out the large template, traced it out onto my paper and got started.  I do love the template that Geneviève Crabe created for this week.  I had not seen her templates and I think they are really cool.  This template made me think of a pinwheel.  I tried to work out a way to make my zendala look like a pinwheel but I fell short.  However, I think that the zendala came out really great and I'm quite proud of how it looks.  I think that I'll be doing more gray paper projects in the future.


I used a micron pen, pencil for shading and a white Derwent pencil for the highlights.  I used Z-Trik on the outer edge.  I had not planned on using it in every section, but after a mistake, I ended up doing it anyway.  It was the first time that I had used Z-Trik like this before.  It's a fun little tangle.  I then added Lanie in the larger triangles.  I like it as well.  I have yet to use it as a whole pattern though.  The center wanted to be Gneiss and it is of sorts but not quite.  I then went back and added Nzeppel.  It took me awhile to decide what to put in that spot.  I wanted something light but didn't want to leave it blank.  Nzeppel worked out great and I like it with the little white highlights.

After getting the drawing done, I went in and added the white highlights and then shaded.  I am so pleased with how it came out.  I havent' really worked with white as a highlight much before.  I am sure that there are some tricks that I haven't figured out yet, but I'm happy with the final result.

Thanks for stopping by.  Have a great day!

Monday, May 6, 2013

Walk this Shway

I must be the first to admit that when I say Shway arrive in my inbox the other day, I did not think that I would ever use it.  Not because I don't like the tangle, but because it looked hard.  I felt like too much spacing and even-ness would be required.  (Confession: mismatched spaces when I want them to be matched makes my eye twitch.)  All that being said, I decided that I was going to figure this out and do the challenge on time this week.

First things first, I played a little with Shway.  I had not tried it out yet.  Once I did a little, and figured out how to get it like I wanted it to be, I pulled out some paper and got to work.  I did a little tic-tac-toe board for a string.  I wanted Schway to take center stage on this one, but I didn't want it to be a monotangle either. I put Shway in five of the spaces so that I would have several chances to vary/experiment with the patterns.   When looking at Shway unvaried and unshaded, I was afraid that the pattern would be quite flat so for the other four spots, I tried to choose tangles that would have dimension. I wanted the other spaces to pop up a little against the flat.


In the end, I'm not sure my other tangles pop up as much as I thought they might, and not all of Shway is as flat as I feared it would.  There is so much possibility for variation here and I really enjoyed experimenting.  I also like the graphic quality of Shway.  It has a pop art feel to me. I am happy with my tile this week.  Not only is it finished in time, but was done in record time for me.

I am also posting last week's Blind String Challenge.  I finished it late Saturday and was too tired to get it shaded, scanned and blogged in time to make the deadline.This was my first go at Phicops and while I certainly have more experimenting with it to feel that I have "mastered" it, I am really glad that I gave it a go and tried it.  I also experimented with Laura's tangle Versa.  I was going for another look that I have done with Versa but, I got distracted and goofed it up.  That being said, I do like the end result.  The other grid pattern is one that I did combining Z-Trick and Flwr Box.  I still need to try those two on their own, but I am pleased with how my combination came out as well.  I was just playing around with ideas when I started this one, so I wasn't sure what the end result would look like.

Thanks for stopping by and taking a look.  Have a great week!

Saturday, April 27, 2013

Hollins Butterfly

This year is my 20th college reunion!  Where did the time go?  I swear that I still feel 21 on the inside!

I attended Hollins College (now University) in Roanoke, VA.  It is a small, liberal arts college for women. The campus sits near the base of Tinker Mountain (where Tinker Tangles takes it's name.) and I am so grateful for my time there.  There are many activities during reunion weekend.  Mini classes, dinners, cocktails, tours of campus and enjoying the great Visual Arts center. The official kickoff is on the Saturday of reunion, when there is a parade of classes.  One of my former classmates asked me to help with a theme for our class.  The first thing that popped into my head was butterfly wings.  Why?  Who knows. But I figured that we could wear wings in the colors of the school and they could symbolize the wings that we have used to carry us these 20 years we have been away.  Plus, everyone loves Butterflies.  I hope so anyway.

Another dear friend asked me if I could make a tshirt for us to wear and if I would create a zentangle to put on it.  Well, I said that I would give it the "old college try" (heh, heh). This is the image I came up with.
 Using the school colors of green and gold (or yellow here), I created this. I drew with a green micron and colored in with a yellow tombow marker.  I also did a few highlights with a yellow sakura gel pen.

Now that I had the drawing done, the real test was to see if I could set up a place on zazzle to make them available to my classmates to buy.  You can even get one here if you'd like.  There are some that say reunion on them and some that are just the butterfly.

I have to say that I am pleased with how they came out.  The design looks best on a white shirt, but I also got it on yellow and I think it looks great.

Happy 20th Reunion to my fellow alumnae!

Earth Day!

Guess what?!  I finally finished one of the Diva's challenges in time to post it!  Shocking I know, as it has been a long time.  I've been checking in every week, and I've even started some, but I've either not finished them or not finished in time.  So, I tried really hard to get mine completed this week.

Following The Diva's example, I too chose to do a zendala.  I don't have any of the nifty tiles though, so I made my own.  I used my circle cutter and cut out a 4" circle on watercolor paper.  I then traveled over the Erin's site The Bright Owl, and pulled my template from Challenge #52.  Being Earth Day, I wanted a template with circles in it and this one jumped out at me.

4" watercolor paper, micron pens and pencil
I knew that I wanted some blue and green on the zendala, so I decided that I'd use them in the middle.  I picked Diva's Dance in blue to be my "water".  For my "earth" circles, I just kind of made it up.  I wanted to have something that looked like fields from above.  I started with squares and then just filled them with rotating patterns or filled the space with just green.  I'm not sure how I feel about the design as a tangle pattern, but it works here for what I was aiming for.  Now, I needed to do the outer sections.  Again, I wanted to have patterns that felt organic or earthy to me.  I used Beeline because, bees!  The other sections are Zin, mostly because I messed up my Beeline set up.  But hey! There are no mistakes in Zentangle.  I had these lovely triangles and Zin fit in perfectly.  The outer edges I used Verve and Tipple.  I thought that Tipple looked like gravel or a rock pile.  After that, I added a little shading and BOOM! I was done.

I really wasn't sure how it would turn out when I got started, but I am pleased with the final result.  As is often the case, shading helped a lot.  The blue and green felt really flat as I opted to not shade the patterns in the circles.  Just the little shade on the edges where they overlap really popped them out and away from each other.

While I have your attention - if you've made it this far- I wanted to share the tile I did for last week's star theme.  I did get it finished in time, but I did not blog it in time.  So without chatter and more words, here are stars!

Well, a little more.  I used watercolor for the blue, micron pen to draw and a little silver sakura gel pen for the lines.  I wanted to give the impression that the stars are shooting stars.  Not sure it works as zooming but I tried!

Thanks for stopping by!

Tuesday, February 5, 2013

A New Challenge, A New Tangle

As it is the beginning of the month, it is time for a Use My Tangle challenge over at the Diva's page.  This week the tangle is Dansk from Margaret Bremner.  I cannot belive that I have not seen this one before.  Or if I have, I confess that I don't remember it.  Dansk is a fun and wonderfully easy pattern.  Mine look more like tree rings but there's nothing wrong with that.  I'll have to remember this one when I am looking for nature inspired patterns.


I managed to keep this tile really quite simple.  Somthing that I have been trying to keep in mind.  White space is ok and can even be your friend.  I borrowed the string from tanglepatterns.com.  Nothing was coming to me as I stared at the blank tile and then I remembered that Linda is collecting string ideas so I clicked over and found one.  I also used Diva Dance for the first time.  Well, for the first time in a completed drawing anyway.  I wasn't sure about this at first but I have come to like it.  All the patterns I ended up picking out all remind me of tree rings, at least they do here.  Maybe Spring is trying to work its way into my brain.  I know it's ready for some sunshine.

I also wanted to share with you the photo mat that I complete for the swap over on Facebook.  It was quite a challenge to do but once I got going at it, I was able to get some bits that I am really proud of.  I still need to spray it against smudging (not that there is a lot of pencil on it) and pop it into the mail.  Luck for me the deadline is in March.  I am HORRIBLE about getting stuff into the mail.  Well, I should say horrible when I need to go to the post office.  If I can print postage and mail it from home then I am not so bad.  I tried on a few new tangles on this as well and that was a lot of fun.

I hope you have a great day!

Tuesday, January 29, 2013

Zendala challenge + color

I am behind on the Zendala dare that Erin hosts each week.  I miss some weeks and I jump back in and something happens and I don't get back to post what I have done, if in fact, I have finished what I started. I have another that I finished drawing, but didn't get shaded.  I'll be going back to finish that today but it's been so long since I drew it, I don't remember which dare it was.  I'm working and that is the biggest thing.

So, color.  It is something that I have dabbled with but it isn't easy for me.  I tend to approach it like a coloring book.  Draw the lines and fill them in.  Shading with color doesn't really happen much for me.  I've done a little but I default to using a pencil more often than not.  I have some great pencils and markers reciently, Tombow markers, Inktense pencils and some Aquasitcks.  I didn't really have much of an idea how to use them, or at least use them to get the most out of them.  Thankfully there are some really great YouTube videos out there to see.  Maybe one day, I will be able to actually do some of the tricks that are in the videos.  :)

As I was doing Zendala dare #41, I decided that it needed to have color.  The template looked like a flower to me, so a flower it would be.  I traced out the template on 6"X6" watercolor paper and got to work.  The center is a pattern by Jane Monk but please don't ask me the name.  It isn't in the image that I have, but I think you can find it on tanglepatterns.com.  I'm just too lazy to go and check it out right now.  The rest flowed from there.  I also concentrated on leaving some empty spaces.

I am really pleased with how it turned out.  Applying color evenly is a struggle for me, so I worked on that a lot as well as using darker shades and/or layering the color to get some suggestion of shade.  I resisted the temptation to go in with a pencil and shade.  I always want to pop the layers out but this is so sweet as it is, I was afraid that pencil would muddy it up.

Another color experiment that I did came along when I got stuck.  The drawing was progressing well and then I got stuck.  Unsure as to what to put in my empty spaces, I looked to a friend for a little help, her suggestion? Color.  So with great hesitation, I went for it.  Armed with Tombow markers, some water and a small paint brush, I went in.   For this drawing, I did go back and add pencil for shade.  I worked very deliberatly and carefully with the shading though.  This was just an experiment to see what I could do with the color and shade.  I learned a bit about me and shading as well as leaving some open space.   


Wednesday, January 16, 2013

Another Duo: Auraknot and Bunzo

It is time for another duo tangle over at The Diva's.  I like duo tangle challenges for several reasons.  One, it is nice not having to think about what patterns to use and two, it usually makes me use tangles that I don't know very well.  This challenge uses Auraknot and Bunzo, two official Zentangle patterns.  I use Auraknot quite a bit.  I really love it.  I confess that I usually use a cookie cutter as a starting place for this pattern.  Maybe one day I'll work up to starting with a freehand design.  Bunzo I enjoy as well, but haven't used very much.  Exploring it this week has been fun.

6X6" cold press watercolor paper, Micron pen and pencil.
When I started this challenge I had no plan at all.  I first marked off the frame.  I wanted a heavier boarder than usual so I pulled out a micron brush pen to make that.  I then drew my auraknot.  There is a little mistake in there.  I almost started over but I just kept at it.  I was hoping that the lines would mask it a bit as I went along, but no such luck.  Oh well, no big deal.

Bunzo just sort of took on a life of its own after that.  For Bunzo, I just went with exploring the process of creating the tangle.  To keep the Auraknot from looking just slapped down, I surrounded it with Bunzo.  After each part seemed to "grow" where it wanted to, I stopped and took a look wondering if I should keep going.  It seemed finished to me so I stopped.  I like the off center-ness of this one.  I hope that you do too.

Have a great week!