There is a monotangle challenge this week at I Am the Diva. The challenge is to use tipple and only tipple. As I am currently working my way through some stencils, more on that in a later post, I wanted to work on a ZIA using the idea of this week's challenge.
I used my fish stencil, and not really sure what fish it is, I searched out the silhouette on google and I think that it is an Angel fish. I went with the markings of a French Angel fish. I used green and purple for the fish and blue and blue/black for the water. It may seem like a test for color blindness, but I think it works.
This post is short, but kids and work await. I hope that you have a great week! Happy 4th to American readers and a belated Canada Day to my friends to the north. Thanks for stopping by!
A spot for me to share my obsession with zentangles. Please contact me at TinkerTangles @ gmail.com should you have any questions or comments. Thanks for stopping by!
Showing posts with label zentangle. Show all posts
Thursday, July 2, 2015
Monday, June 1, 2015
UMT: All Boxed Up
A new month, a new tangle to learn over at I Am the Diva CZT. This month the tangles is called All Boxed Up from Alice Hendon. This is a fun tangle and reminds me a lot of my own pattern Zuan Shi. Alice's tangle is so simple though. There are a lot of variations possible with this and I can't wait to use it more.
I started this tile with a stencil outline as my string. I added the dot and dash to the outline. I know it has a name but I can't think of it. While I was trying to think of what else to add, I decided to play with the idea of a mirror image. After coloring in half black, I added the All Boxed Up but managed to mess the variation that I planned on using. No matter, it just adds more interest for the tile. After that was done, I added more black and kept going with Printemps.
This was a fun tile to draw. The gelly roll pen that I used for the white worked very well. Maybe it was because I was drawing over the prismacolor marker or maybe it is because it is really warm and the ink likes it warm. Whatever the reason, I was glad.
I hope that you all have a great week. Thanks in advance for your wonderful comments and for stopping by.
Tuesday, May 19, 2015
White on Black
Draw in white on black is the challenge that Laura has put to us this week over at the Diva. I am not sure what happens to me when I make this simple switch but just changing the ink color can stymie my progress faster than anything else. Maybe it is just that I over think it. Who knows. This week though, I wanted to embrace the challenge. Getting things started has been difficult for me these days, so I used the challenge to do something, anything no matter how it looked.
For white ink these days I have been using a dip pen and white ink from Speedball that has been thinned with some water. The ink is great but when it isn't thinned, I have to fight with it to get the ink from the pen onto the paper. I still have my white gelly roll pens but when I want to do a lot of drawing, not just some highlights, I go for the Speedball ink.
My first try at this week's challenge was going well. I started with Arukas and went from there. It was when I decided to give Athitzi a try that I jumped to a new piece. I almost never just abandon a drawing, it is a rule of mine. Pushing through a drawing that I am not excited with has resulted in some of my favorite designs. Other times, a little piece that I love turns into a study for a new drawing to come. Either way, today I didn't want to push through, I wanted to try out more Athitzi right away. The pattern is so simple, yet I have not had good luck making it work the way I wanted it to.
So, launching onto another 5x7" of black drawing paper, I drew some circles randomly and got started. My first circles are very controlled but I can tell when I got the hang of the pattern. I worked quicker and the lines weren't so straight any more. They get a little hook on the ends and while I do pick up my pen for each stroke, they touch and seem to be connected sometimes. The dip pen worked for me here and a against me. I like the way that the ink becomes more grey as the reserve is used up. It makes for nice variation in the strokes and even makes over lapping strokes stand out a bit more. Where it worked against me is my lazy hand. I smeared this a bit by not watching where I placed my hand. In all though, I think the smears work rather than ruin. In the end, I think it works and I am trying to decide if they look more like dandelions or fireworks.
This is a zendala that I did a few weeks ago. I wanted to try a larger drawing in white and black. Sorry for the odd photo. It is too large for my scanner. I hope you all have a great week! Thanks in advance for stopping by and comments you leave.
For white ink these days I have been using a dip pen and white ink from Speedball that has been thinned with some water. The ink is great but when it isn't thinned, I have to fight with it to get the ink from the pen onto the paper. I still have my white gelly roll pens but when I want to do a lot of drawing, not just some highlights, I go for the Speedball ink.
My first try at this week's challenge was going well. I started with Arukas and went from there. It was when I decided to give Athitzi a try that I jumped to a new piece. I almost never just abandon a drawing, it is a rule of mine. Pushing through a drawing that I am not excited with has resulted in some of my favorite designs. Other times, a little piece that I love turns into a study for a new drawing to come. Either way, today I didn't want to push through, I wanted to try out more Athitzi right away. The pattern is so simple, yet I have not had good luck making it work the way I wanted it to.
So, launching onto another 5x7" of black drawing paper, I drew some circles randomly and got started. My first circles are very controlled but I can tell when I got the hang of the pattern. I worked quicker and the lines weren't so straight any more. They get a little hook on the ends and while I do pick up my pen for each stroke, they touch and seem to be connected sometimes. The dip pen worked for me here and a against me. I like the way that the ink becomes more grey as the reserve is used up. It makes for nice variation in the strokes and even makes over lapping strokes stand out a bit more. Where it worked against me is my lazy hand. I smeared this a bit by not watching where I placed my hand. In all though, I think the smears work rather than ruin. In the end, I think it works and I am trying to decide if they look more like dandelions or fireworks.

Wednesday, April 29, 2015
Labyrinth Tangle
I was so excited to see this week's challenge over at The Diva. The challenge is to use a labyrinth as the string. I was excited am I have had this idea kicking around in the back of my mind but I haven't pulled it out.
The challenge gave me just what I needed to pull it out. While Laura gave us instructions to draw our own, I found a layout online and traced it onto some grey paper. I love the look of a labyrinth, it is so graphic. But at the same time, as the designs are so often in gardens, I didn't want to go graphic but wanted it to have a more natural feel to it. I drew in brown ink for the basic out line and then used a micron to draw Betweed in the spaces. I "walked" this labyrinth several times while making this piece. First to draw it, then to draw Betweed, then to embellish the design and then finally to shade.
There are some great labyrinth paths on line and I think that I will have to check them out and see what else I can come up with. Drawing my own would also be a great place to start and see what I can come up with.
Last week Ginny Stiles asked me to show her my dip pens that I use. I was unable to figure out how to load a photo in the comments so I am posting a photo here. The pens in the image are the three that I use most often. The brown with the gold nib is one that I can change out the nibs on. I use my pen for drawing and not calligraphy, so I keep the nib to one that makes a thinner line. There are those that can make a thick line but I haven't used them much. All I can say about working with a dip pen is practice. It takes a light touch and dipping in the ink often to keep the line the same. I am by no means an expert. I have made many mistakes and am really just making it up as I go. My favorite ink is Winsor and Newton drawing ink. It mixes easy and has great color saturation. I just have an initial set but there are tons of colors. Anyway, I hope that seeing the pens help Ginny.

There are some great labyrinth paths on line and I think that I will have to check them out and see what else I can come up with. Drawing my own would also be a great place to start and see what I can come up with.

Have a great week everyone! Thanks for taking a look and for your wonderful comments.
Wednesday, April 22, 2015
Earth Day 2015
The earth here in Delaware has started to really wake up and I am so glad! The leaves are popping out and early flowers have started to bloom. We even had our first thunderstorm this week. Spring is really here. Each year, over at The Diva, Laura posts an Earth Day challenge. This year is no different.
I tried another zendala this year. I adapted a mandala pattern from a book I have to make it more zentangle friendly (read opened some space for tangles) and gave it a go.
I am so happy with how it turned out. For the "water" I used a dip pen and Winsor & Newton blue ink. I love how the Crest 2 pattern turned out. I want to fill a whole page with those awesome waves. Look for this in another design soon. I used my green Sakura pen for the Garlic Cloves and Diva's Dance. A little ink wash and some white ink fescu finished out the center.
I hope that the weather is nice for you on this Earth Day. Thanks for stopping by and taking a look.
Wednesday, January 14, 2015
Happy 200!
Over at The Diva, Laura has posted her 200th challenge. Quite an accomplishment I must say. As the challenge this week, we are to make a monotangle of our go to tangle. My go to tangle changes from time to time but currently it is Garlic Flower (or at least that is what I think that it is called.) I have tried to locate the blog where it originated but I have having some trouble finding it. If you know, please link to it in your comment so that I can edit this post and add credit where it is due.
My most hearty congratulations to Laura on her wonderful achievement. You are a constant source of inspiration both in your art abilities and as a Mom. I am looking forward to 200 more!
I made this on one of the black zentangle tiles, using a thinned Speedball white ink and a dip pen. I want to explore negative space more so I thought I'd use this challenge as a try. I hope you like it.
Have a great day!
Wednesday, October 29, 2014
Tone on Tone Monotangle Ensemble
Say that title three times fast! Yeah, I don't want to either.
Sometimes over at the Diva, Laura throws us a challenge that is REALLY a challenge for me. This week the challenge is to use the tangle Betweed in a monotangle. Meaning, use only the tangle Betweed in your tile. This tangle is a challenge for me because it feels awkward to me as I make the strokes. Well, it does in the "traditional" way of creating it. I am much better at it when filling in a line or section but trying to do it in a circle really changes the feel of creating it. Why? I have no idea. My brain, sometimes she sees things and sometimes she don't. Anyway, as I contemplated even participating this week, I thought to myself that there is a reason it's called a challenge so suck it up and do it!
At first I tried to force Betweed into a tree shape. I had checked out a few of the wonderful entries this week and saw a lot of Halloween shapes so I wanted to try something different. I thought that if I could get a tree to work, maybe I could make it into a card for the holidays. Yeah, that didn't work out so well. It wasn't terrible, but not so good either. I didn't even finish the tile. I decided to move onto a new idea. But what?
In the last few days I have been using some of the Sakura Gelly Roll pens that I have collected as accents in my inktober pieces. I bought some of the glaze pens a while back. At the time I had an idea to use the black glaze on black paper and see how that looked. Like so many of my ideas however, I never got far. With the idea of using Betweed in the round, I pulled out my glaze pens, a square of black paper and a circle to trace, and I gave things a go.
I think that part of where Betweed hangs me up is the little spot of shadow. I always make my lines and then go back to add a shadow spot. This time using the glaze pen I tried something different. The ink in the pens really flows and will puddle on you quite easily. With that in mind, I started each line with a small circle and then made the line. If the pen is going to puddle on you, why not use it to your advantage? I was so excited that not only did the black on black stand out - the glaze ink has a nice shine to it - but the tangle turned out pretty well too. The scan has the paper more gray than black but it is still a good image of the tile. Since the line of the pen is "fat", I did these on a 5" square. I debated trying to shade this but I like it without shade so I left it alone. Once this one was finished, I was so excited by it I pulled out the rest of the set, matching colored paper and DID ALL THE COLORS! There is a clear glaze that I tried on a white paper but it REALLY didn't show up. For the white then, I used a Gelly roll glitter pen. After I got all of the colors done, I realized that I had 9 tiles so I have put them together in an ensemble. I think that I will put them in their own 5" frames and hang them in one big square on the wall. A few of the colors didn't scan so well. The tone on tone was hard for my scanner to see, that or maybe the shine of the ink threw it off a bit, but I think that you can get the idea.
Sometimes over at the Diva, Laura throws us a challenge that is REALLY a challenge for me. This week the challenge is to use the tangle Betweed in a monotangle. Meaning, use only the tangle Betweed in your tile. This tangle is a challenge for me because it feels awkward to me as I make the strokes. Well, it does in the "traditional" way of creating it. I am much better at it when filling in a line or section but trying to do it in a circle really changes the feel of creating it. Why? I have no idea. My brain, sometimes she sees things and sometimes she don't. Anyway, as I contemplated even participating this week, I thought to myself that there is a reason it's called a challenge so suck it up and do it!
![]() |
BeTreed (see what I did there?) |
In the last few days I have been using some of the Sakura Gelly Roll pens that I have collected as accents in my inktober pieces. I bought some of the glaze pens a while back. At the time I had an idea to use the black glaze on black paper and see how that looked. Like so many of my ideas however, I never got far. With the idea of using Betweed in the round, I pulled out my glaze pens, a square of black paper and a circle to trace, and I gave things a go.
![]() |
Black on Black |
Sorry that I made you get through all this rambling to get to the finish. :) Thanks for stopping by and for all of your lovely comments. Your support is invaluable to me.
Have a great week!
Tuesday, October 21, 2014
Pretty in Pink Flowers
October is Breast Cancer Awareness month. Over at the Diva's challenge, Laura is honoring her Grandmother who had breast cancer. The challenge is to use pink to honor someone you know that has/had breast cancer. I did zentangle inspired art to honor Laura's Grandmother, my Godmother, and my friend who all battled breast cancer and for my Aunt who had cancer but is luckily now cancer free.
While it didn't scan really well, the pink here has a little shimmer to it. I started by watercoloring the background and using a dip pen and india ink, drew my garden over the top. I used variations of Diva's Dance and Arc flower and the top flower is inspired by Charles Rennie Mackintosh. I think that someone has already done a step out for a pattern like it but I am not sure. I was going to shade with my prismacolor markers here but the paint really stopped that from happening. I'm not sure why, maybe the paint and the alcohol? but as I started, the marker picked up the pink as I went and was not doing nice things. So, I stopped and made a light wash with the india ink and used a small brush to shade. The outside shading is the marker.
I like the whimsy of the piece and even the pink (a color that I don't usually embrace). This is also doing double duty for my inktober drawing for today. Not too bad for a morning's work.
Thanks for stopping by and for all the wonderful comments each week. I appreciate them all, I just don't usually have time to go back and comment to everyone individually. Have a wonderful week!
Labels:
Arc Flower,
Breast Cancer Awareness,
Charles Rennie Mackintosh,
Dip Pen,
Diva Dance,
Diva's Challenge,
ink,
inktober,
JJ LaBarbera,
Pink,
Watercolor,
zentangle,
Zentangle Inspired Art
Tuesday, October 14, 2014
Yuma tangle
A new month brings a new tangle in the spotlight over at I Am the Diva. This time the tangle is Yuma by Tina. I like this tangle but my version needs more practice. When using this tangle in the past, I have started out not liking the results but by the end, I like it a lot.
For this week's challenge, I decided to use a black zentangle tile. As I have been using a dip pen lately, and have some white speedball ink, I used those to draw. The results were mixed. I have had issues using this ink before. I haven't figured out if it is me or the ink yet (me I think) but it doesn't want to work well with the nibs that I have used. Not to worry, I will keep at it. My results are:
For the tile I tried the original version of the tangle. I also tried my hand at Onion Skins, another new tangle I haven't tried. I enjoyed it but it also needs a little work on my end. I started to "shade" with a white charcoal pencil but changed my mind and just stopped. To fill in, I used a small brush as the pen wasn't cooperating. So, this tile, not my best but I learned doing it.

I have used Yuma once before a few weeks back. I gave it a try when making a pin and experimenting with a new Shrinky Dink film. I used a black and pink sharpie to draw and used a Sakura gold marker to fill in the seed shapes. I felt a little lost as I was going but by the end I liked how it came out.
Happy belated Thanksgiving to those who celebrated in Canada. I am looking forward to Thanksgiving here in the US. My family will be here to visit and I am excited to see them.
I hope you all have a great week and thanks for stopping by!
For this week's challenge, I decided to use a black zentangle tile. As I have been using a dip pen lately, and have some white speedball ink, I used those to draw. The results were mixed. I have had issues using this ink before. I haven't figured out if it is me or the ink yet (me I think) but it doesn't want to work well with the nibs that I have used. Not to worry, I will keep at it. My results are:
For the tile I tried the original version of the tangle. I also tried my hand at Onion Skins, another new tangle I haven't tried. I enjoyed it but it also needs a little work on my end. I started to "shade" with a white charcoal pencil but changed my mind and just stopped. To fill in, I used a small brush as the pen wasn't cooperating. So, this tile, not my best but I learned doing it.
I have used Yuma once before a few weeks back. I gave it a try when making a pin and experimenting with a new Shrinky Dink film. I used a black and pink sharpie to draw and used a Sakura gold marker to fill in the seed shapes. I felt a little lost as I was going but by the end I liked how it came out.
Happy belated Thanksgiving to those who celebrated in Canada. I am looking forward to Thanksgiving here in the US. My family will be here to visit and I am excited to see them.
I hope you all have a great week and thanks for stopping by!
Wednesday, October 8, 2014
Love is Love
I believe in love. Love drives all of us crazy. Do we have it? Can we get it? Do I deserve it? For some finding the person who means the most to you in the world is a lifelong search while for others love seems to happen quickly. In a world where there is more than enough hate and animosity to go around, I support love where it is found and that includes love between people of the LGBT community. This week in the US, the Supreme Court declined to rule on cases where same sex marriage. While this doesn't give a clear and final ruling on the issue in the United States, it to open the door for each state to decide. I am happy that the state I live in, Delaware, allows same sex marriage. I have several gay and lesbian friends and love them with all my heart. Their families are no different than my own and I am proud to be included in their lives.
Why is she going on about this you may ask? Well, I'll tell you. This week Laura over at The Diva's challenge, accepted a challenge from a young man named Daniel, who at 12, is already an outspoken supporter of the LGBT community. He thought that a challenge in support of National Coming Out Day would be a good idea and I do too. Congratulations to Daniel for putting out the challenge and to Laura for hosting what can be a controversial issue. Thank you both for this wonderful idea. It has been a great challenge for me.
![]() |
Love is Love |
I started this challenge with the center design of zinger. Zinger is a new tangle for me and I have really fallen in love with it making it in the round like this. I have done it several times on the Shrink Art Necklaces that I make and on ornaments as well. The black and white section is a variation of several different tangles (H2O Lilly and Mathura for example) but is kept very plain and simple. I wanted the section to add interest but not overwhelm the piece by adding too much pattern or color. The outer layer is Wud. I love the way the pattern looks in black and white but after I drew it in, I decided to color it like a rainbow. ROY G BIV is my new BFF. Hee Hee! I used Sharpie markers for the center and a Sharpie Pen for the drawing on this one. I didn't have a rainbow of microns so I broke into the sharpies. I drew this on bristol board as well. The colors were added to Wud with Prismacolor color pencils and the shading done with Prismacolor markers. The whole thing is on 9" square paper.
This zendala personally makes me happy and I am so proud of it. I hope it makes you happy as well. I have set this image up on zazzle to be available on a variety of products. It isn't quite available at this time but it should be by this time tomorrow. You can check them out here.
Thanks again to Daniel and Laura.
Monday, September 29, 2014
Blind Sting - Test Case
Fall has arrived here in Delaware not only on the calendar but in the weather as well. This past weekend was really nice with highs in the low 80's but I think that was the last hurrah of summer. The leaves have begun to change and there is no going back now. If I were smart, I'd pull out warmer clothing now but I think I'll stay in denial a little longer.
The new week has brought a new challenge over at I am the Diva. This week is to use a blind string, that is, to draw the sting without looking. This string challenge always has me drawing in a kind of swirly lump in the middle of the tile. My first try was really not useable. Not only where there a lot of spaces, which isn't a problem really, but they were so small that drawing in them would be impossible. So, I went at it a second time. I should have been more willing to go wild and not worry about staying on the paper but I wasn't. That's ok though. I need to work on leaving some white space too. I try to fill it all in every time so this string was good for me.
You see the pen I am using there? I bought it in Italy this summer on our family vacation. I have used it a little but I got it out to use today. I have decided to participate in inktober and wanted to practice with the pen I am planning to use. Inktober is a drawing challenge where you make up to 31 drawings in 31 days. You can work a shorter number, check the link for details, but I want to give 31 a go. Over the summer, I was cutting up some scrap paper to use as smaller tiles and/or test paper and ended up with some 3" squares. I thought that I would draw on the smaller tiles and then group them together into a larger piece. So far though, they have only been an idea waiting to happen. So when the idea of inktober came to me, I thought, "Why wait? Let's do it now!" And as October is just a few days away, I thought that I would use today's challenge as a test run to see how it would go.
The dip pen makes a nice thin line and covered over the pencil string well. I am still getting used to having to refill my ink but it isn't as disruptive as one might think. Sometimes I wait until I run out of ink so I have to go back over a little to keep the line even. The design stayed pretty simple. I wanted to work on curving lines as those can sometimes trip me up with the dip pen.
I was afraid that the slightly smaller tile size would be too small for me to work on, but it wasn't. I haven't tried the even smaller Bijou tiles/size yet. Maybe that is next.
But back to this tile, I held close to the string but let the design run to the edge to let it feel a little less constrained. I could have done more but I didn't want to over work the design and wanted to work quickly.
For the shading I used a new Prismacolor marker. Color: warm grey 30%. This is the first time I have had a Prismacolor marker and the first time that I have used a marker to shade a drawing. I have used them on canvas though. I like the pen and look forward to using it in the future. It is nice to make a shade line and not have to go back and blend it out with a stump. It is a different feel though and I look forward to exploring more.
I hope that you will join me in inktober. It will be nice to have a daily challenge and the smaller size will keep me from spending all day drawing. Not to mention increasing the likelihood that I will finish my goal. You can follow my challenge either on my Facebook page or on instagram (@tinkertangles).
Have a great week!
You see the pen I am using there? I bought it in Italy this summer on our family vacation. I have used it a little but I got it out to use today. I have decided to participate in inktober and wanted to practice with the pen I am planning to use. Inktober is a drawing challenge where you make up to 31 drawings in 31 days. You can work a shorter number, check the link for details, but I want to give 31 a go. Over the summer, I was cutting up some scrap paper to use as smaller tiles and/or test paper and ended up with some 3" squares. I thought that I would draw on the smaller tiles and then group them together into a larger piece. So far though, they have only been an idea waiting to happen. So when the idea of inktober came to me, I thought, "Why wait? Let's do it now!" And as October is just a few days away, I thought that I would use today's challenge as a test run to see how it would go.
The dip pen makes a nice thin line and covered over the pencil string well. I am still getting used to having to refill my ink but it isn't as disruptive as one might think. Sometimes I wait until I run out of ink so I have to go back over a little to keep the line even. The design stayed pretty simple. I wanted to work on curving lines as those can sometimes trip me up with the dip pen.
I was afraid that the slightly smaller tile size would be too small for me to work on, but it wasn't. I haven't tried the even smaller Bijou tiles/size yet. Maybe that is next.
But back to this tile, I held close to the string but let the design run to the edge to let it feel a little less constrained. I could have done more but I didn't want to over work the design and wanted to work quickly.
I hope that you will join me in inktober. It will be nice to have a daily challenge and the smaller size will keep me from spending all day drawing. Not to mention increasing the likelihood that I will finish my goal. You can follow my challenge either on my Facebook page or on instagram (@tinkertangles).
Have a great week!
Friday, September 19, 2014
Diva Duo
Every week I check in to Laura Harm's site for her weekly Challenge. I don't always make it to the end of the week with a challenge completed. Often, if I manage to do the challenge, I don't always get it posted here. Why? Laziness. But this week! This week I got it finished, scanned and am now going to post. I'm on a roll baby!
So the challenge is to create a duotangle using only the tangles Diva Dance and Phicops. I was happy to see these two tangles being used as I used the two together this summer and wanted to explore them further. The idea was added to my idea list, but stayed there until this week.
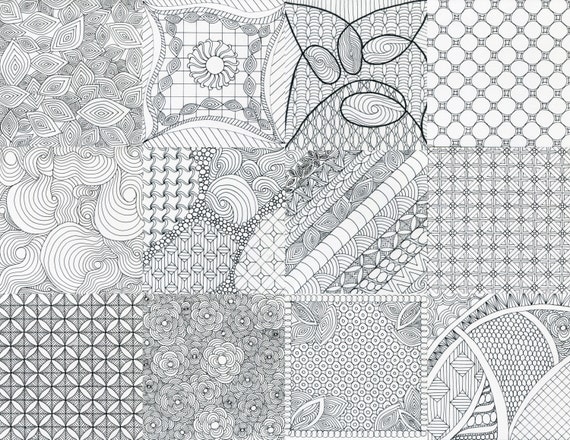
As you may know, I created the artwork for a coloring app this summer. You can read more about it here. After finishing, I wanted to keep going with the coloring idea and made a book, which you can also read about in the link. Anyway, one page was a nod to zendalas with half zendalas covering the page. See the bottom of the image on the right. While I like all the designs here, I really love the bottom one. So, this was my inspiration for the challenge this week.
Wanting to separate the challenge from the coloring book, I chose to use tan drawing paper as a beginning. I then used black, brown and a burgundy micron pen for the drawing. Exploring colored paper is a lot of fun and I really experiment with the idea of white as a highlight. I have a white chalk pencil that I use and it is really nice.
I redrew the phicops and diva's dance from the coloring book but then I was a little stuck. I was really happy with what I had so far but the drawing didn't feel finished yet. And as the challenge only allows for the two tangles, I wasn't sure what to use next or how I wanted to use it. I opted for diva's dance and making it look different than I had used it before.
The new burgundy pen is the outer layer and I like it. On the brown paper it doesn't look as red as I would think, more of a darker brown. I opted not to fill in the spaces in there and to me it feels like drift wood. I used the chalk pencil to add a little highlight there.
I hope that you like this as much as I do. I am really proud of the shading and highlights on the phicops. I was thinking of it as a sea creature but then a friend said it looked like a meringue so now I'm conflicted. :)
Thanks for stopping by today. Have a great weekend!
So the challenge is to create a duotangle using only the tangles Diva Dance and Phicops. I was happy to see these two tangles being used as I used the two together this summer and wanted to explore them further. The idea was added to my idea list, but stayed there until this week.

Wanting to separate the challenge from the coloring book, I chose to use tan drawing paper as a beginning. I then used black, brown and a burgundy micron pen for the drawing. Exploring colored paper is a lot of fun and I really experiment with the idea of white as a highlight. I have a white chalk pencil that I use and it is really nice.
I redrew the phicops and diva's dance from the coloring book but then I was a little stuck. I was really happy with what I had so far but the drawing didn't feel finished yet. And as the challenge only allows for the two tangles, I wasn't sure what to use next or how I wanted to use it. I opted for diva's dance and making it look different than I had used it before.
![]() |
Drift |
I hope that you like this as much as I do. I am really proud of the shading and highlights on the phicops. I was thinking of it as a sea creature but then a friend said it looked like a meringue so now I'm conflicted. :)
Thanks for stopping by today. Have a great weekend!
Wednesday, September 3, 2014
Get Your Coloring On

The app, Coloring Advanced Tangles launched this week in the App Store on iTunes. I am pretty excited to share this with you. There are two versions of the app, a paid and free version. Both are pretty great, the free version has ads. By clicking here, you can go to the store and download it today.
The app is really fun. John Young, the app builder, did a really great job. John built the app and I did all the artwork. If you download it, would you please take a moment to rate it?

If you download the app and/or buy the images in etsy, I invite you to share them with me on my Facebook Page. I would love to collect them in a folder to share with others (with your permission of course).
I really enjoyed creating the images for the app. It was fun to draw with a different frame of mind. While drawing, I needed to keep in mind that someone would be coming behind me to fill in the white areas with color and that I would not have shading to help me in popping out patterns to separate one from the other. The fun thing that I discovered was that thinking of those things, did not keep the process from being "zentangle". I can tell you that there is really something freeing and mindful in making the same pattern over and over again.

Making these pages was so fun that after I finished them, I almost immediately started on a full size coloring book. Naturally, you can also buy a copy of that in my etsy. The book made it's debut this weekend at the Arden Fair in my area. I can report that it was quite popular with people of all ages. Not only is it fun to color, but a great way to practice shading.
Thanks for stopping by and taking a look, oh, and listening to my sales pitch. I am really excited about the app and the coloring book. They have been the work of my summer and I have had such a fun time.
Saturday, August 16, 2014
New App and Contest!
Hello! It has been a while since I posted but I wanted to take a moment and share some exciting news!
Last month I was contacted by John Young of John Young Apps to work with him to create a coloring app based on Zentangles. John already has one app, Coloring Advanced in the app store and it's pretty cool. Having never created coloring pages before, I thought that I would enjoy the challenge so I accepted it.
I created the 12 images in the app using my own tangle patterns as well as some of the official tangle patterns. Once they were done, I scanned them and sent them off to John who then did the hard part/magic and created the app.
The app is complete and has been accepted by the Apple App Store and will be available on August 31st. There will be two versions available, one is free with ads, and a paid version that has no ads and some extra color options. All the images will be available in both versions of the app. But before that happens, I have 5 codes to giveaway that will make the full, ad free version available to you before it is available to the world. I have both versions and John's other app and I can tell you that the apps are fun and easy to use.
If anyone is wondering, I will not be making any money from this app. It was John's idea and John's hard work to create the app. I will however be offering a download of the images in the app through my etsy shop for the same price as the paid app ($1.99) should anyone wish to support me and/or like to color the images on paper.
So, now that all the talking is out of the way, now for the fun part. Entering! There are going to be 5 winners. Each winner will get ONE code to open a fully unlocked and ad free version of Coloring Advanced App. I am also running the contest on my Facebook Fan page, and instagram account (@tinkertangles). If you'd like to enter there you can, but you may only win one time.
This contest is run on Rafflecopter and starts tomorrow. I am not smart enough to embed the code here so, Enter here to win!
Sunday, May 4, 2014
Zentangle + Shrinky Dinks = FUN!
About this time last year, I got the idea to tangle some Shrinky Dink film and see what would happen. I thought that it would be fun to make some medallions to string on necklaces. When I am at Art and Craft shows, I find that pre-teen and teen girls are often very interested in my drawings but don't have the cash to invest in the pieces that they like best. There are note cards and prints available at the table but honestly, note cards are a thing of the past for these girls. Prints, well they will need frames. The idea of the necklaces I hoped would be a good idea, the price point isn't too much ($12 at shows and $14 on etsy) and if I do say so myself, they are fun. It turns out, that a lot of people like the necklaces notjust the younger girls. Each is an original piece of art, all are different, and even if I reused a template, it is unlikely that I would make it again in the same way. One zendala medallion even inspired me to turn it into a larger zendala on paper.
Any of you that also follow me on instagram (TinkerTangles) will often see these pieces as they progress. One of my followers there asked if I had a tutorial on how I created the necklaces. I have been thinking that I should do a post about them and the request has led me here today. So, I will do my best for you that are interested. Hopefully this will be helpful. Please let me know if I am not clear of didn't answer a question that you may have.
Many of you may remember Shrinky Dinks. I LOVED playing with them as a kid. Usually they came in packages with pre-printed designs that you then colored in with markers or colored pencils. Those can still be found online and probably in some stores. I use just blank sheets to create by medallions. You can also find all of their products on their website. There are a lot of choices there. I may have to do a little online shopping as I only have 3 kinds. I buy mine at Michaels. There are 10 sheets in a pack and I get at least 4 medallions out of each sheet. If you search shrink film on Amazon, you will find that there is another kind, I forget the name, but I have chosen to stay with a product I know. Speaking of products that I know, let me tell you what I use when drawing these.

Supplies:
1. Shrink film. I use Shrinky Dinks Crystal Clear, Frosted Ruff N' Ready, and Bright White.
2. Pens/Markers: I mostly use Sharpie MARKERS. The Sharpie pens will work on the Ruff N' Ready as the back is really rough and can eat the tip of your marker. The pens seem to hold up to that texture pretty well and doesn't bleed.
I also use the Sakura Identi Pens. They really work well and the double tip is nice so that different line widths can be made. The drawback though is that the colors are limited to primary colors and black. I like the color choices that Sharpy has.
I have also used the Bic Mark-It but I am afraid that they fade over time. So far I haven't had any reported issues, but I had one medallion that sat in the sun for a while and the darker colors faded. Probably because of the fact that it sat in the sun, but I don't want to take any chances.
3. Paint Pens: I use Oil paint pens. Water based ones don't want to work as well. I have used Sharpie brand, the Sakura Metallic pens and Deco Color pens. For all of them I use the extra fine or ultra fine point. I do have a few larger ones though. I use those when I want to fill in a large area or cover the back in one color.
Now for the nitty gritty, making your design. I first cut out my shape. It is easier to start that way to me. For the pieces that I am currently making, I keep the film to 4.5". My circles are 4.5" in diameter. Squares or other shapes can vary but I make a point to have my largest size 4.5". Remember that your film is going to shrink down, so keep in mind what size you want your final piece to be when you cut your film. A 4.5" circle shrinks down to about 1 3/4". Some of you may be more math minded and can figure out the shrink down percentage. I am not however, and just tried different sizes until I had what I wanted.
When it comes time to bake your film, I follow the directions that come in the package. They say a toaster oven is ideal but I use my regular oven and have great results. There are some that use a heat gun but I think that an oven is best. In an oven, the heat is even and since they need to be in the oven for 3 minutes, easier on your hand. A heat gun works great though if you have a problem area after shrinking and want to smooth an area out. I bake my film on parchment paper. The directions call for using a paper bag but I don't like the texture of the paper bags.
If you watch your film shrink is is both very cool and a bit scary. When the film starts to shrink, it is going to flop about, curl around and has even been known to flip over! Don't fret however and DO NOT yank it out of the oven. Let your film stay in the oven the full 3 minutes. It will correct itself and lay flat. Only once or twice have a had a piece fold over on to itself and stay that way. That has happened when I was trying to make a really small piece. Sometimes, my circles come out a bit wonky, I'm not sure why though. By wonky I mean that it isn't quite round anymore. More of an elongated circle.
Once your three minutes are up, you can take your piece out of the oven. THEY WILL COOL QUICKLY! I take mine out of the oven, lift the parchment and medallion off the cookie tray, and set the on the counter. I place a smaller piece of parchment on the top of the film, and use a small book to press lightly down on the film. (Don't use anything with a texture on it unless you want this texture pressed into the hot plastic.) This will help make sure the piece is flat. That doesn't mean that even then the piece is totally flat but usually it is. I have now decided what an acceptable level of wonky is. You can also return the pieces to the oven, it will not shrink more, but it will make the plastic pliable again so if needed, you can press them flat again.
Now for some tips.
The photo above is the first medallion that I made. It is on the Ruff N' Ready film. First I trace/draw the outline or string. Then I add my tangles and color.
Ruff N' Ready film. This film needs to have all of the rough parts colored in. You don't have to, but I don't care for the way it looks uncolored. Cheap colored pencils work great for this film. I use Crayola pencils. You can layer your colors with this. Just remember to do it in reverse. The shiny side is the side you are supposed to look at. Put down your color and add darker colors on top to create shading. Highlights are going to go down first. After these are done, I go back and add a layer of acrylic clear glaze over the rough parts. It seals the colors so that they don't get rubbed off.

Crystal Clear Film: You can draw on both sides of this film. Create your design on one side and flip it over to paint sections to add color. When you do it this way, the design on the front casts a shadow onto the color and gives it more depth. You can also use a marker to add color in your design like a coloring book. Lighter color markers give the finished piece a light catcher look.
Bright White Film: This film will take the Sharpie markers and the Oil markers really well. Sometimes after shrinking, the oil paint seems to sit differently on the film giving it a bit of an embossed look. Markers are smooth. If you want to be more traditional in bringing Zentangle to this medium, all you need is this and a black marker.
Pens: I have not been able to get micron pens to work on the plastic film. I find that it wipes right off. The same thing happens with the Sharpie Pens when drawing on the smooth film. Sharpies don't. The color can "puddle" at the end of a line though so you'll want to keep that in mind. The puddles can help to add "shade" where you'd like it. There are gray pens that you can use for shading but I haven't had much luck there. For me, the lighter the color the better. Colors will become darker and more intense when after shrinking so keep that in mind when choosing your color pallets.
A few examples of finished pieces:
Any of you that also follow me on instagram (TinkerTangles) will often see these pieces as they progress. One of my followers there asked if I had a tutorial on how I created the necklaces. I have been thinking that I should do a post about them and the request has led me here today. So, I will do my best for you that are interested. Hopefully this will be helpful. Please let me know if I am not clear of didn't answer a question that you may have.
Many of you may remember Shrinky Dinks. I LOVED playing with them as a kid. Usually they came in packages with pre-printed designs that you then colored in with markers or colored pencils. Those can still be found online and probably in some stores. I use just blank sheets to create by medallions. You can also find all of their products on their website. There are a lot of choices there. I may have to do a little online shopping as I only have 3 kinds. I buy mine at Michaels. There are 10 sheets in a pack and I get at least 4 medallions out of each sheet. If you search shrink film on Amazon, you will find that there is another kind, I forget the name, but I have chosen to stay with a product I know. Speaking of products that I know, let me tell you what I use when drawing these.

Supplies:
1. Shrink film. I use Shrinky Dinks Crystal Clear, Frosted Ruff N' Ready, and Bright White.
2. Pens/Markers: I mostly use Sharpie MARKERS. The Sharpie pens will work on the Ruff N' Ready as the back is really rough and can eat the tip of your marker. The pens seem to hold up to that texture pretty well and doesn't bleed.
I also use the Sakura Identi Pens. They really work well and the double tip is nice so that different line widths can be made. The drawback though is that the colors are limited to primary colors and black. I like the color choices that Sharpy has.
I have also used the Bic Mark-It but I am afraid that they fade over time. So far I haven't had any reported issues, but I had one medallion that sat in the sun for a while and the darker colors faded. Probably because of the fact that it sat in the sun, but I don't want to take any chances.
3. Paint Pens: I use Oil paint pens. Water based ones don't want to work as well. I have used Sharpie brand, the Sakura Metallic pens and Deco Color pens. For all of them I use the extra fine or ultra fine point. I do have a few larger ones though. I use those when I want to fill in a large area or cover the back in one color.
4. Cutting Tools: I am lucky in that I have a Sizzix eclips that I have started to use to cut my film. It is so much easier. The machine is so great and cuts like a dream on the shrink film. HOWEVER, you do not need to buy an expensive machine. (A friend split the cost with me or I wouldn't have one.) Before the machine I got a circle cutter. Martha Stewart makes a nice one and you can adjust the size to what you want your circle to be. Scissors can be helpful to trim edges or to cut squares and or cut around any particular shapes you are making. Hole punch is also good to have around. If you decide to create a medallion, you'll need a hole to attach it to the jewelry finishings. The size of a regular hole punch is a perfect size.
5. Jewelry Finishings: What you will need to make your necklaces, pins or earrings. I use very simple satin cord as a necklace and add a bail to the medallion to attach it. There are some shrink art crafters out there that make some INCREDIBLE pieces of jewelry. While their work is very inspiring, I am keeping mine simple. If you already make jewelry, you might have all the stuff to make some impressive pieces.
![]() |
My first medallion. The outline, the tangles, adding color and the final product. |
When it comes time to bake your film, I follow the directions that come in the package. They say a toaster oven is ideal but I use my regular oven and have great results. There are some that use a heat gun but I think that an oven is best. In an oven, the heat is even and since they need to be in the oven for 3 minutes, easier on your hand. A heat gun works great though if you have a problem area after shrinking and want to smooth an area out. I bake my film on parchment paper. The directions call for using a paper bag but I don't like the texture of the paper bags.
If you watch your film shrink is is both very cool and a bit scary. When the film starts to shrink, it is going to flop about, curl around and has even been known to flip over! Don't fret however and DO NOT yank it out of the oven. Let your film stay in the oven the full 3 minutes. It will correct itself and lay flat. Only once or twice have a had a piece fold over on to itself and stay that way. That has happened when I was trying to make a really small piece. Sometimes, my circles come out a bit wonky, I'm not sure why though. By wonky I mean that it isn't quite round anymore. More of an elongated circle.
Once your three minutes are up, you can take your piece out of the oven. THEY WILL COOL QUICKLY! I take mine out of the oven, lift the parchment and medallion off the cookie tray, and set the on the counter. I place a smaller piece of parchment on the top of the film, and use a small book to press lightly down on the film. (Don't use anything with a texture on it unless you want this texture pressed into the hot plastic.) This will help make sure the piece is flat. That doesn't mean that even then the piece is totally flat but usually it is. I have now decided what an acceptable level of wonky is. You can also return the pieces to the oven, it will not shrink more, but it will make the plastic pliable again so if needed, you can press them flat again.
Now for some tips.
The photo above is the first medallion that I made. It is on the Ruff N' Ready film. First I trace/draw the outline or string. Then I add my tangles and color.
Ruff N' Ready film. This film needs to have all of the rough parts colored in. You don't have to, but I don't care for the way it looks uncolored. Cheap colored pencils work great for this film. I use Crayola pencils. You can layer your colors with this. Just remember to do it in reverse. The shiny side is the side you are supposed to look at. Put down your color and add darker colors on top to create shading. Highlights are going to go down first. After these are done, I go back and add a layer of acrylic clear glaze over the rough parts. It seals the colors so that they don't get rubbed off.

Crystal Clear Film: You can draw on both sides of this film. Create your design on one side and flip it over to paint sections to add color. When you do it this way, the design on the front casts a shadow onto the color and gives it more depth. You can also use a marker to add color in your design like a coloring book. Lighter color markers give the finished piece a light catcher look.
Bright White Film: This film will take the Sharpie markers and the Oil markers really well. Sometimes after shrinking, the oil paint seems to sit differently on the film giving it a bit of an embossed look. Markers are smooth. If you want to be more traditional in bringing Zentangle to this medium, all you need is this and a black marker.
Pens: I have not been able to get micron pens to work on the plastic film. I find that it wipes right off. The same thing happens with the Sharpie Pens when drawing on the smooth film. Sharpies don't. The color can "puddle" at the end of a line though so you'll want to keep that in mind. The puddles can help to add "shade" where you'd like it. There are gray pens that you can use for shading but I haven't had much luck there. For me, the lighter the color the better. Colors will become darker and more intense when after shrinking so keep that in mind when choosing your color pallets.
A few examples of finished pieces:
![]() |
Geisha Inspired Zendala |
![]() |
Starry Starry Zentangle |
![]() |
![]() |
Different Zendala ideas |
Saturday, October 19, 2013
Dot - Dot - Dot - Dot - Dot
This week the challenge that Laura put forward is Pointillism. I confess that I have never tried this style of drawing before, or at least, not that I can remember. I guess maybe I have as the tangle pattern Rain Dotty is pointillism. However, I have not tried to create a whole piece of art using just this style. I really focused on the method here. Trying to play with the dots to show more depth in some areas while little in others. I ended up doing two for this week. First I used an older micron on a square of watercolor paper. I followed Laura's example a bit and kept things non-tanglely at first but later added more defined pattern. After I was done, I went back and added a little pencil for shade in a few spots. After I was finished, I found more to the tile than I thought there was. Some of the sections, blend one into the other to create a curved look that I certainly didn't plan. As my teacher in college would say, it was a "happy accident".
Next I was drawn to give this method a try on canvas. I took a blank black canvas board I have and used white oil pen with a white charcoal pencil for shade. This one was really abstract. I just started tapping away over a minimum of pencil string and this is what I came up with.
It reminds me of a shoe. I'm not sure why but it does. I am pleased with how it turned out. What is it? Who cares?
I will certainly explore pointillism more and keep it in mind while working on my pieces.
Monday, September 30, 2013
They Might Be Zentangled.
One of my favorite bands is They Might Be Giants. I have loved the Johns and their music since college. Soon after my oldest son was born, TMBG came out with their first kids album, NO!, so I got to share their music with him. TMBG and all of their albums have taken us on many a long car trip in musical agreement.
Recently, the band played in Philadelphia for a free show with WHYY. The band played some new songs from their new album Nanobots but also many great classics that I have loved for years. One of the songs they played was Ana Ng. A great song that tells a great story but also has a line that says: "I don't want the world, I just want your half." As the song was playing, I was inspired to try and create a ZIA inspired by that line. It has been a while since I created a ZIA just for me so I thought that this would be a great one to do.
I started this one with just the circle and dividing lines drawn. I didn't use a string to further divide, I just went with designs as they came to me and went from there. This one is on watercolor paper and is 7.5" X 9". It is an odd size, but I wasn't thinking about that when I started.
Recently, the band played in Philadelphia for a free show with WHYY. The band played some new songs from their new album Nanobots but also many great classics that I have loved for years. One of the songs they played was Ana Ng. A great song that tells a great story but also has a line that says: "I don't want the world, I just want your half." As the song was playing, I was inspired to try and create a ZIA inspired by that line. It has been a while since I created a ZIA just for me so I thought that this would be a great one to do.
![]() |
I don't want the world, I just want your half. |
Now to nerd out for a moment. I have an instagram account (@TinkerTangles) where I post photos of my work as I go. It is fun for me to share my process and sometimes, if I get stuck, seek out some feedback from others. After I got the drawing done, I posted a snap of it and shortly went to bed. When I woke the next morning I found a comment. See that there, the one from they_might_be_giants? That is from the band! Not gonna lie, I almost shouted with glee. I'm a dork I know but that was so cool to see. My 13 year old was pretty impressed. TMBG is now one of his favorite bands as well, so he could share in my excitement.
I working on this drawing though, I learned a pretty important lesson. DO NOT LEAVE ART SITTING ON THE FUTON! I have a room in the house that I have taken over as my "studio". It does double duty as the guest room as well, so there is a futon in there. When guests aren't sleeping on it, the futon becomes a staging location for what I am doing. It's covered with paper, paper cutter, bags from Michaels etc. So, as my desk was full, I put the drawing on there while I worked on something else. The cat managed to scrape his claws across it and marked the paper. You can see it in the image. Luckily, I can remove the most visible marks in my photo program. I am going to get a limited number of prints made of this so, removing those scratches is important to me.
So, lessons learned, art made. I hope that you like this piece. Leaving so much "empty" space is something that I usually don't do. This one a fun one. It holds a personal meaning to me and was a lot of fun to do.
Wanna hear the song that inspired this? Check out this video:
Tuesday, September 24, 2013
Knights Over Tipple Challenge
The other day I realized that it has been 4 (!) months since my last blog post. I really need to set time aside each week to sit and post something for those who visit here. I won't promise that I will though. Because I know me. I will try, but I can't say I will. I have been furiously working away however.
In the attempt to create an alphabet in tangles, I decided that I will try to use the Diva's Challenge each week as not only a challenge for Zentangle but as a double challenge to myself to work on an alphabet tile. I am using some letter cookie cutters that a dear friend gave me long ago as my stencil. I really love cookie cutters as stencils. They come in all shapes and sizes and no printing is required. Just set it where you'd like the design, trace the outline and get get started.
This week is the first in the (hopefully) future series of 26. As M was at the top of the bucket, M is the kickoff letter. The challenge is to use just two patterns on the tile. Those tangles are Knightsbridge (a checkerboard pattern) and Tipple (circles).
I started with the M, using it as a string in this piece. I drew out the boarder first. I knew I wanted that to be Knightsbridge. Then I tippled (is too a word) the M. I thought about varying the center here and adding to the Knightsbridge but I decided that simple was the way to go. After getting that done, I had this empty spot that I needed to put something in. The blank paper was just too empty and didn't look right. So after a mid morning trip to Starbucks and the Post Office, I came back to this. With caffeine kicking, I decided to freehand some wonky lines for the Knightsbridge and then Tipple over the spaces. Combining them to make a Tipplebridge. Tee hee!
Things were a bit busy there until I got some shading in to pop the M up from the background. Here I only shaded around the M and again at the outer edge, separating the Tipple from the border. In the end, I am happy how this turned out. I wasn't sure that the final tile wouldn't look too busy, it still is. With the shading however, the separate layers "stack" as it were, to make things easy to see.
I hope to sit and get some more posts in soon. I have been working on Shrinky Dinks lately. I have been using past Bright Owl challenges to make medallions for necklaces. I have also been doing some rectangle pendants. I debuted them at the local Arden Fair and the necklaces sold quite well. So well, that I posted the remaining in my etsy shop. I have made 4 more in the last few weeks and hope to have them completed soon.
So, have a great day all you out there! I look forward to seeing what cool things you have come up with for this challenge.
Tuesday, May 14, 2013
Gray for Number 57
I am trying to post more to the Zendala and the Diva's challenges. I had been doing really well but then I fell off for a while. I had been putting my efforts into getting things done for Art and Craft fairs so that took up a bit of time. Then winter set in and my creativity was sapped away by the dark and cold days. So, with the warmer weather, my energy as returned and man, does it feel good.
In my trips to Michaels over the last several months, I have seen the toned gray and toned tan drawing tablets. I think that the look on the colored papers is very beautiful. Plus the addition of the white as a highlight really sets things off. I've been thinking about trying it but I kept from putting it in my basket. I didn't need another distraction AND I have a drawer full of paper already. Really, how much paper do I need to horde? This weekend however, armed with coupons and a search for supplies for a commission, I saw that the gray notebooks had been marked down. So, of course I grabbed one.
Wanting to get back to the dare and using my gray paper, I decided to combine the two and see what happened. I printed out the large template, traced it out onto my paper and got started. I do love the template that Geneviève Crabe created for this week. I had not seen her templates and I think they are really cool. This template made me think of a pinwheel. I tried to work out a way to make my zendala look like a pinwheel but I fell short. However, I think that the zendala came out really great and I'm quite proud of how it looks. I think that I'll be doing more gray paper projects in the future.
I used a micron pen, pencil for shading and a white Derwent pencil for the highlights. I used Z-Trik on the outer edge. I had not planned on using it in every section, but after a mistake, I ended up doing it anyway. It was the first time that I had used Z-Trik like this before. It's a fun little tangle. I then added Lanie in the larger triangles. I like it as well. I have yet to use it as a whole pattern though. The center wanted to be Gneiss and it is of sorts but not quite. I then went back and added Nzeppel. It took me awhile to decide what to put in that spot. I wanted something light but didn't want to leave it blank. Nzeppel worked out great and I like it with the little white highlights.
After getting the drawing done, I went in and added the white highlights and then shaded. I am so pleased with how it came out. I havent' really worked with white as a highlight much before. I am sure that there are some tricks that I haven't figured out yet, but I'm happy with the final result.
Thanks for stopping by. Have a great day!
In my trips to Michaels over the last several months, I have seen the toned gray and toned tan drawing tablets. I think that the look on the colored papers is very beautiful. Plus the addition of the white as a highlight really sets things off. I've been thinking about trying it but I kept from putting it in my basket. I didn't need another distraction AND I have a drawer full of paper already. Really, how much paper do I need to horde? This weekend however, armed with coupons and a search for supplies for a commission, I saw that the gray notebooks had been marked down. So, of course I grabbed one.
Wanting to get back to the dare and using my gray paper, I decided to combine the two and see what happened. I printed out the large template, traced it out onto my paper and got started. I do love the template that Geneviève Crabe created for this week. I had not seen her templates and I think they are really cool. This template made me think of a pinwheel. I tried to work out a way to make my zendala look like a pinwheel but I fell short. However, I think that the zendala came out really great and I'm quite proud of how it looks. I think that I'll be doing more gray paper projects in the future.
After getting the drawing done, I went in and added the white highlights and then shaded. I am so pleased with how it came out. I havent' really worked with white as a highlight much before. I am sure that there are some tricks that I haven't figured out yet, but I'm happy with the final result.
Thanks for stopping by. Have a great day!
Monday, May 6, 2013
Walk this Shway
I must be the first to admit that when I say Shway arrive in my inbox the other day, I did not think that I would ever use it. Not because I don't like the tangle, but because it looked hard. I felt like too much spacing and even-ness would be required. (Confession: mismatched spaces when I want them to be matched makes my eye twitch.) All that being said, I decided that I was going to figure this out and do the challenge on time this week.
First things first, I played a little with Shway. I had not tried it out yet. Once I did a little, and figured out how to get it like I wanted it to be, I pulled out some paper and got to work. I did a little tic-tac-toe board for a string. I wanted Schway to take center stage on this one, but I didn't want it to be a monotangle either. I put Shway in five of the spaces so that I would have several chances to vary/experiment with the patterns. When looking at Shway unvaried and unshaded, I was afraid that the pattern would be quite flat so for the other four spots, I tried to choose tangles that would have dimension. I wanted the other spaces to pop up a little against the flat.
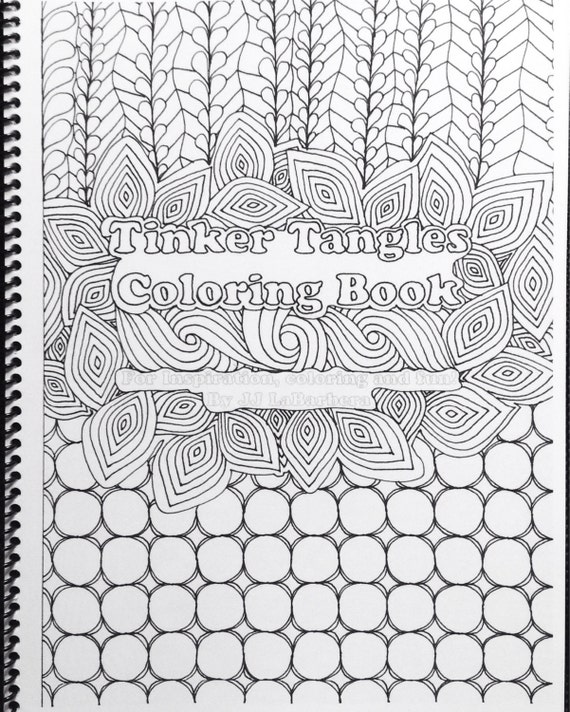
I am also posting last week's Blind String Challenge. I finished it late Saturday and was too tired to get it shaded, scanned and blogged in time to make the deadline.This was my first go at Phicops and while I certainly have more experimenting with it to feel that I have "mastered" it, I am really glad that I gave it a go and tried it. I also experimented with Laura's tangle Versa. I was going for another look that I have done with Versa but, I got distracted and goofed it up. That being said, I do like the end result. The other grid pattern is one that I did combining Z-Trick and Flwr Box. I still need to try those two on their own, but I am pleased with how my combination came out as well. I was just playing around with ideas when I started this one, so I wasn't sure what the end result would look like.
First things first, I played a little with Shway. I had not tried it out yet. Once I did a little, and figured out how to get it like I wanted it to be, I pulled out some paper and got to work. I did a little tic-tac-toe board for a string. I wanted Schway to take center stage on this one, but I didn't want it to be a monotangle either. I put Shway in five of the spaces so that I would have several chances to vary/experiment with the patterns. When looking at Shway unvaried and unshaded, I was afraid that the pattern would be quite flat so for the other four spots, I tried to choose tangles that would have dimension. I wanted the other spaces to pop up a little against the flat.
In the end, I'm not sure my other tangles pop up as much as I thought they might, and not all of Shway is as flat as I feared it would. There is so much possibility for variation here and I really enjoyed experimenting. I also like the graphic quality of Shway. It has a pop art feel to me. I am happy with my tile this week. Not only is it finished in time, but was done in record time for me.

Thanks for stopping by and taking a look. Have a great week!
Subscribe to:
Posts (Atom)