Pages

Saturday, December 10, 2011

Zentangle Cats


5X7 on watercolor paper done with a purple micron .01, grey watercolor pencil, and pencil for shading.

I mentioned in an earlier post that I had some gifts that I was working on but had to keep secret.  This is one of them!  This was done as a Christmas gift for a family member.  We don't get to see each
other at Christmas so when we did get to see one another at Thanksgiving, we exchanged our gifts.

I am pleased to report that she loved her tangle.  I framed it in a 8X10 black frame I found at Michaels.  I think that I came out nicely.

Wednesday, November 30, 2011

Christmas Ornaments

It is that time of year again!  The holidays are here and the level of activity grows more everyday.  So what do I do?  Find a new project of course.  What? Doesn't everyone?

This year there is no shortage of teachers to buy for at my house.  My 5 year old is in two different pre-school classes, each has a teacher and an assistant.  My 11 year old may have just one homeroom teacher but there are helpers, assistants and other teachers as well.  I have started with the idea of gifting just 5 people, but I will need to see if my 11 has any one he would like to give something to besides his homeroom teacher.


Pens and star ready to get to work.
 I saw a zentangle ornament on Pintrest a few weeks back and thought it was great.  I also thought that ornaments would be a cute way to "dress up" a teacher gift.  So Monday, I found myself wondering the aisles and looking for something to tangle and hang on the tree.  I thought of using a plain ball ornament but I have found that curved surfaces are not always my friend.  I found some flat porcelain shapes that I thought would work.  I ended up choosing a star shape.  As I was not sure how the micron pen would work on porcelain, I next went looking for a pen to use.  I almost got Sharpie Oil based markers to use, but the color options that were available were not to my liking and the nibs were also fairly large.  I still want a pretty fine tip to use.  I ended up going with Marvy Uchida Decocolor oil pens.  They have an extra fine tip and work well.  The paint flows nicely and so far, doesn't clog or skip.  I am also using the Sakura Pen-touch gold pen.  It is a larger tip and not fine point at all.  The end though, it just large enough to make a nice gold dot where I want it.

I bought an extra star to create my sample on.  At only $1.50 per star, I can afford to make a mock up.  I can make my mistakes there and work out any kinks I may encounter with patterns, pens, or problems there first.  I ended up using Tripoli on the stars.  I wanted a pattern that I felt comfortable doing free hand, looked good without shading, and I could embellish as I wanted. 


Getting started

I left the background white and started with the red pen. I almost stopped right here.  I thought that the red really popped out and that my Tripoli was quite a success.  However, I wasn't sure if all the remaining white space was a good idea.  I didn't want it to look unfinished.  As I really loved the red, I didn't want lose it and decided to switch to green.  After that I went in and added green dots to the red and red dots to the green.  Next, I went back again and put a small gold dot in the center of the groupings. 

Detail of final Star.


After I finished the first one, I took a break so that I could see it with new eyes and see what changes, if any, I would make to the next ones.  I decided that while I liked the added dots, the pattern was too busy.  On the next star, I did Tripoli the same, but left out the red and green dots but kept the gold ones.

I like the design this way.  The open triangles keep it from feeling too busy and the gold dots add a focal point for each "section" of Tripoli and just a little sparkle.  I bought a different red ribbon that I'll add to them before we give them away.  I got a clear sealer to go over top of the pens.  They are said to be permanent but I figure that the clear coat will help to prevent scratching over time. 


First try

The kids and I will work together and decide what to note on the backside.  I am still debating what else we may give them, a gift card maybe, but this is a great start.  These don't take that long to tangle.  In a few days, after they have had more time to dry, I will clear coat them.  I am really enjoying making these.  I may have to go back and get some more shapes to try out.


Biggify

This week the challenge from The Diva was to make our tangle patterns larger than we usually do.  I had been thinking of this very thing for a little while.  I really love the tangle Tripoli yet when I go back to add embellishments to my triangles, I think that sometimes they become muddled.  I seem to be afraid to made a bigger design though.  Why?  Who knows.  It was nice to get "permission" this week to stretch out the patterns and to give them the room to grow.

Funnily enough, I didn't use Tripoli in my tile. I started with Rain.  I like the graphic quality of it and as I have just started to use it, I wanted to explore it more.  I chose Fife because I need more practice with it.  Making it large makes it easier for me to create it.  Bigger gives a lot of negative space behind the pattern which almost begs for more pattern there but I stopped and just shaded.  I thought about blacking the background but I was afraid that I would lose Rain.  I next tried SOCC.  This is a new pattern and is quite striking I think.  I am really looking forward to using it more in the future.  Lastly, I added Umble.  I love it's curves.

I will try to work a little bigger in the future.  I confess I get stuck with the same size patterns and to break that pattern will be a challenge but a fun one.  Bigger will be fun when it comes to adding layers of tangles to a tile or ZIA, and I look forward to the challenge.

Tuesday, November 22, 2011

Red Thread

This week, Cris Letournea, CZT at Tangled Up in Art is guest hosting the challenge from The Diva. Please click the link to find out more about The Red Thread Promise.  It sounds like a great cause.  I will be happy to donate my tile.

I'm afraid this post will be short.  In the run up to Thanksgiving, my time and energy are short and I fear that if I don't post now I won't get to it.  So with out further delay, my Red Thread tile.

I hope that those celebrating have a wonderful Thanksgiving holiday.  For anyone who isn't, I hope that you have a wonderful week.

Tuesday, November 15, 2011

New Pattern: Allium

I have recently joined Pintrest.  I think that there are several of you who are on Pintrest as well as I have found you and because there is a lot of zentangle art posting.  I don't go on as much as I could but I have to be prepared to sit for a while when I log in.  There is a lot to see.  If anyone doesn't have an account and would like one, I think it is still join by invite, just hit me up via email and I'll send you an invitation.

Why all the Pintrest stuff?  Because it is there that I saw an incredible tattoo that inspired this tangle. 
Click the link to see artist information.

Is that not awesome?  Talk about a zentangle tat!  I swear that I would get this exact tattoo if I...
1. had the nerve. 2: Was sure my kids wouldn't hate me. 3. Had a better body.  Lets face it, you don't get a back piece and not show it off.

An anonymous commenter has noted who the artist is.  I am so glad to have his name and information.  He is  Alexis Calvie from Black (he)art Tattoo in France.  I plan on checking out more of his work and I hope you do as well.  If I ever find myself in France, I think I may find him and get my first tattoo.

I was really taken buy the whole thing but I was drawn to the pattern on the left in the middle.  It is so mesmerizing and visual.  My eye is just pulled to it automatically.  I thought that it would make a great tangle pattern.  So, I sat down to play with it a bit and see what I could do and this is what I came up with. 


I say to end with an empty space on the outside as I found that to end with black, the pattern runs together with the next one.  That might be nice sometimes but I didn't care for it.  I ended up choosing the name Allium as the pattern reminds me of an onion with its many layers.  Allium is the Genus of the onion and I thought that sounded good.

I tried it in several tangles. In this week's challenge and in the Punzel challenge.  I also gave it a try on black scrapbooking paper with a white gel pen.

I have a little trouble keeping this pattern small.  I know how to make it smaller but I just get carried away.

I hope you like it.  I'm interested to see if anyone else uses it and how they do.  If you use it, please post a link.  I would love to see your work!

Tri Shapes Challenge

This week The Diva's challenge is hosted by Sue Clark.  I was excited to see that Sue was hosting.  I have enjoyed and been inspired by Sue's work for a while.  The challenge was another great way to explore string making.  I really liked the idea of using overlapping shapes to create the string for several reasons.  One, I am forever feeling stuck when it comes to strings.  I'm not sure why, but my pencil always wants to go the same way everytime.  Using shapes is a great way to get going without having to worry about the rut my pencil is in.  The other is that there is always a shape of some kind in the house.  I can just pick one up and get started.  Using tangles that we have not used before is also a great challenge.  There are so many patterns out there that I have seen and wanted to use but haven't yet.  This was a perfect excuse to just jump in and not over think the pattern.

First I drew my string.  I used my circle template to make the circle and then just a straight edge to make the triangle and the rectangle.  I probably should have free handed them but my freehand can be a bit wonky.  I'm getting a lot better at accepting the wonky but I'm not all the way there yet.

Once I made the string, I pulled out my iPod to look for tangles that I had saved but not used yet.  I really wanted to try Veins by Lizzie Mayne since I saw it.  The tangle reminds me of an album cover from the 90's but please don't ask me which one, I can't remember.  Knowing that I wanted to use that one first, I plopped it right in the middle.  Not practicing most of these tangles first was a real leap of faith, but I am pleased with the outcome. 


I made sure to write down the names of the tangles on the back of the tile and using Sandra Kay Straight's blog, I was able to go back and get the names and the links.  She has the hook up for patterns.   The new patterns I used here are the previously mentioned Veinz, Bowties by Lori Howe, Flubber by Molossus (Ms. Straight), Galoo by Carol Ohl, and Golven by Mariet.  I confess that I had used Golven before in a birthday gift but I love it so much, I wanted to try it again.  I had a little triangle so I added Paradox and just filled the other with stripes. 

I also used a new tangle of mine that I am calling Allium.  It reminds me of on onion cross section so I chose Allium which it the genus of the onion.  I will post steps and examples of Allium in my next post.  The inspiration for this tangle came from a tattoo.  I don't have any tattoos and have never thought that I'd like one, but after seeing this one, I almost took the photo and my back down to the local place to get one, but more on that next.

Thank you to Sue for a fun challenge and thanks to the Diva for bringing the challenge to us each week.

Sunday, November 13, 2011

Birthday Gifts

Red Velvet cake.  So yummy!
Fall is a busy time of year for me and birthdays.  Not only do many of my family members turn a year older but also do many of my friends.  This year, I have made zentangles for several people.  I can't post them all yet on the off chance that they may see them.  This weekend though, I was able to gift a few and now I can share them with you.


5X5 on watercolor paper with 0.1 and 0.005 micron pens and pencil.
This is a zendala that I made for my friend Cheryl.  I found this mandala pattern on 102 Free Mandalas to download.  This is a nice place to find many different mandalas.  This one was a little different than what I used but I really liked the shape.  You can download the patterns as .jpeg or PDF files.

I really enjoyed making this and am surprised at how quickly it went.  I framed it in a 10X10 float frame, with a black piece of scrapbooking paper to fill the empty space.  I had hoped to put it in a 10X10 with a 5X5 square cutout to frame it but I made the zendala too big and none of the premade frames would work.  I waited too late to have it framed professionally.  I was quite pleased with how it came out though.  The paper had a black on black pattern on it and with the zendala in the middle it looked quite nice.  The pattern on the paper was just enough to give it interest but not too busy to distract the eye.


5X7 on watercolor paper with 0.1 micron and gold gel pen
This one is for my friend Kent.  While I didn't plan it, this one works double time as Kent is a New Orleans Saints fan and their colors are black and gold.  This photo is of the tangle in the frame so there is a little glare in the glass but not much.

I tried to alternate the dark and light patterns in this one.  I tried a new pattern Golven and I really like it a lot. It isn't difficult to do and looks great.  I look forward to using it again and again.

I am glad to report that both Cheryl and Kent enjoyed their tangles as much as I did making them.  I hope that you enjoy looking at them too.

Thursday, November 3, 2011

All Hallows Eve Challenge

It's a new week and lots of goings on around here.  Not only is/was it Halloween but we have also become the host to an Italian exchange student.  She may be here for just a short while but maybe longer.  It is still up in the air at this point.  We have tried to be welcoming but not overwhelming, I hope.  My 5 year old can demand a lot of time when he is excited.  If you are ever in the mood for a tour of his hot wheels cars, just come on by! :)

I had to work this year on Halloween and sadly missed all the fun.  But, I do get to enjoy the candy while skipping the long walk to get it.  The challenge this week was to do a Halloween tile.  I confess, I quite enjoyed this one.  I enjoy them all but this one was fun to explore.  Which image to put forward? Which tangles are "scary"?  I started looking over Halloween themed clip art for my image and went from there.  I couldn't choose which I wanted to do more so I did them both.

The eyes came out great I think.  I had to fight myself to leave the white space.  They don't float out of the space as I had imagined them to but I don't mind.  While working on this one, the pattern for Pweeko came across my feed and I tried it out.  I like it.  I've already added it to my tangle "stash".

Next, I wanted to do something a bit more obviously Halloween and went with a skeleton.  I now think that it is a bit more Grateful Dead than Halloween but I don't mind.  That is why it's called "Grateful Tangle".

I really left more white space than I have been lately and I'm really glad that I did.  I'm not sure what the background tangle is called.  It reminds me of Nzepple.  It hints at spider webs to me.

I hope that you all had a fun, safe and Happy Halloween.  The busy time of the year is about to kick off for me at work so I hope to still work on the challenges.  I really look forward to them each Monday morning and it's nice to have a direction to head in when I pick up my pens.

Thursday, October 27, 2011

Blue Owl for the Boy

While I was making the zentangle owl for my internet friend, my 4 year old asked for his own owl but he wanted his to be blue.  I had several different owls he could choose from but he wanted the same owl.  It took me a little while to get this owl done, I kept getting distracted, but he is all done.  My son loves it and we're going to hang it up in his room.

Punzel

This week there is a new tangle from Rick and Maria called Punzel.  Naturally when I saw the email I knew that the challenge this week would be to use Punzel. This was a double challenge for me as I did not know Changing either.  I still need to work out some kinks in both of these tangles but I think I have the gist of it.  My swoops are a bit narrow and come out looking more like crescent moons than ribbon but that's OK.  I think the effect makes it look a bit sci-fi.

I used my scanner to get this week's zentangle posted so please forgive the harsh quality to the image.  There is no sun today and I don't think we'll see it for a few more days, so taking a good photo is out of the question.

Thursday, October 20, 2011

I'm Beginning to think a lot on Christmas

I guess this year I have joined those that start thinking about Christmas before Halloween is over.  Normally I wait until later in the season but the mood came early this year.  It all started with Christmas cards.  The last several years, I have been super about getting cards but not sending them.  Last year I didn't even get around to it.  But THIS YEAR, I will do better.  These may be famous last words but well, that wouldn't be the first time.

I am working on a Christmas project with a friend and that made me think of cards.  This year I am going to make our cards. I have tangled some ornaments on a card, added a bit of red and green and voila! I have cards. My work place even offered a deal on getting them printed at 40% off. Sweet!  They are prepping for printing now.  I am also having the inside message printed to make it even easier on myself. Next I will just get a family photo printed so I can put it in the card. Then all that is left is to get them addressed.  I may even tangle a design and have the stamps made at one of those online places.  That may be over doing it a bit.  We'll see when my steam runs out.

I may do a few more holiday patterns. I bought some snowflakes and trees to trace and tangle so I might as well give them a try too.


I'm quite pleased with how it turned out.  If they look good printed up, I may make our card every year.  Also, I bet it will be a good incentive to get my other card designs made.

Tangled on the Inside

This was a fun challenge.  The Diva and Jo had us use one tangle pattern as the string and then fill the string with different patterns.  I had done something similar with Bales in a previous challenge, so I wanted to try something different this time.  I ended up using OOF as my string tangle and then went crazy inside.


Hopefully it isn't too busy to see OOF in there.  I like the stripe on the sides of the tile itself as well as framing each tangle.

Wednesday, October 12, 2011

Sunflower!

To honor The Sunflower Fund, the challenge this week from the Diva was to draw a sunflower.  The Sunflower Fund to support the South African Bone Marrow registry.  This is a great cause and we should have something similar here in the USA.  Maybe we do and I don't know about it.  My Mother died of acute myelogenous leukemia in 2007.  She battled to beat the disease so that she could get a bone marrow transplant but unfortunately, was unable to get to that point.  As soon as I heard that she may need a transplant I was ready to get tested to see if I might be a match.  My Uncle had already volunteered to be tested and was found to be a match.  He did this without being asked.  This makes him my hero, I guess I should tell him that huh?  I think that those who have volunteered to join the registry in ANY country is a hero.  I want to say thank you.

Now, on to my challenge tile.  I copied the Sunflower Fund sunflower and used it as a template for my tile.  I REALLY love Laura's sunflower that she tangled.  It is stunning.  I wanted to draw one just like hers.  But, after a bit of brainstorming, I figured out which tangles I wanted to use.  Drawing this tile went quite quickly for me.  I have gotten really bad at tanking my time while tangling.  I take a lot of breaks, sure, but when drawing, I just move slow.  It was nice to get this one done at such a quick pace.

I used a micron for the drawing and a yellow colored pencil for the well, yellow.  I opted to shade the outside of the sunflower and skip any shading on the tangles.  I may go back and add some, but for now I like it as it is.  I may do a few more of these this week and if I do, I'll add them.

Thanks for taking a look and visiting my blog.  Say Hi sometimes.  :)

Tuesday, October 11, 2011

New Pattern: Leafly

I "created" this pattern while working on my Housewarming piece for a friend.  I was in search of patterns that would mimic nature to use in this piece.  If I was drawing bugs and animals, I wanted them to sit in a pattern that makes sense.  I'm kind of surprised that there isn't a pattern like this already.  Maybe there is, but I didn't see one in my searching.  If you have one like this, please let me know and I'll take it down. 


The basic shape is really easy.  It's a leaf with an outline around it.  Then just fill the remaining space with more leaves until you have as many as you want.  I shade the middle line as well but it is a bit hard to see in this scan. I have put a few variations on this example.  Leafly can be as busy as you like, or as dark as you need.

I hope you enjoy this one.  It's so easy.  

New Pattern: Ticking


I call this new pattern Ticking because when shaded, it looks a bit like stitched fabric (to me anyway).  It is really quite simple.  Steps 2 and 3 can be combined but I do them separately so that I can make the space divisions as even as possible.  It helps if I have a starting point.  I tend to get carried away with lines if I don't start from a divided location.

It's a little like Bales at the start and you can start with a grid or just make your ovals at even distances and go from there.

I hope you like this one.  I haven't seen a pattern like this out there in the Zentangle universe but if you have please let me know.  Also:  I had one heck of a time coming up with a name for this one.  If there is another pattern named Ticking let me know and I'll rename it.  I googled and didn't find one, but you know how inexact Google searches can be. 

Thursday, October 6, 2011

Breast Cancer Awareness

October is National Breast Cancer awareness month.  Did you know?  I didn't until this week's challenge from The Diva.  I have had 3 women in my life to battle breast cancer.  One was my Godmother Cam.  She fought bravely but sadly was taken by the disease in the late 1980's.  Another is my Aunt who has successfully battled breast cancer with a minimum of side effects.  The last is someone I met on the Internet and who I think is truly the definition of hope, strength and courage.  Julie is battling cancer currently and I have every hope for the best possible outcome.  She is a beautiful person and I am proud to call her a friend.

It is these three women who I thought of as I drew my zentangles for this week's challenge.  I will get to send Julie and my Aunt their zentangles, and will keep the one I drew for my Godmother as a reminder of her and her strength and love.

I started each of these tiles with on outline of a ribbon. After deciding on what tangle I wanted to put on the ribbon, I divided the remainder of the space behind and finished the tangle.  I used the micron pen, a white and pink gel pen and pink colored pencils.


Tangle for Cam


Tangle for Aunt Susie

Tangle for Julie

Thursday, September 29, 2011

Jonqal/Opus

This week the challenge is to use just two tangles in our zentangle this week.  Just using two tangles isn't hard for me, I don't think so anyway, but using Opus is.  I don't usually use this tangle and I'm not really sure why.  It looks like I have some more practice ahead of me for Opus.  Some of you have such beautiful Opus.  Mine is a bit plain, but as I said, I have some practice ahead of me.


I do like the interplay with these two tangles.  The flow of the Opus is a nice counterpoint to the rigid Jonqal.

Thanks to everyone for the really great comments on last week's challenge.  My 4 year old had a great time playing with it.

Hope you are having a great week.

Monday, September 26, 2011

Hoo are Yooo?

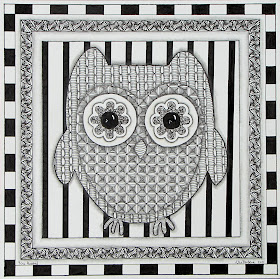
I have an online friend who is redoing a room in her house in all black and white.  She has picked lovely things to go in it but when I saw it, I knew that I needed to make a zentangle for her.  That room is made for a zentangle.  Maybe one day I'll make my own black and white room too.  She also loves owls so guess what her ZIA is?


The bedding she chose for the room has a lovely graphic stripe accent so I pulled that in for the background.  I think that I made a new pattern for the outside of the owl.  I haven't seen it anywhere else.  I wanted something that would look "feathery".  I still need to draw it up and think of a name.  It is really quite simple.

This one is an 8X8 square on watercolor paper and done with micron pens.

Wednesday, September 21, 2011

Pinwheels for Peace

Today is the International Day of Peace!  Get out there and spread the peace because we sure could use it.

In honor of this day and the Pinwheels for Peace project, The Diva has challenged us all to create our own pinwheel.  I was afraid that I was going to miss the deadline but I got in just under the wire!  This was a fun and new way to create some zentangle.  I chose to actually create a pinwheel and I found myself thinking more about what patterns to put together and how they would translate to a 3D page.

I ended up cutting a square of watercolor paper to tangle on.  I am happy to report that my pinwheel even spins!  I took it outside on this cloudy day to try and get a photo and the pinwheel kept spinning in the breeze.  I just wish I had an outside pinwheel to tangle now.


Finished and all put together!


The inside.


Outside flaps


Wednesday, September 14, 2011

Love is All You Need

The challenge from the Diva this week was about love.  Love overcoming Hate.  Something that I wish that could prevail more often in this world.  Some days it seems like people work so hard to hate and tear each other down.  Imagine what the human race could do if all that energy was used to find common ground and build one another up.  I should think that what we could do as a people would be pretty amazing indeed.

This challenge found me with a lack of imagination but I did try.  My first tile didn't come out as I had imagined it would.  About halfway through I almost abandoned it but kept going.
Love, Love, Love, Love

In the end I liked parts of the tile but as a whole I wasn't happy with it so I tried again.

This time I drew out the word love and went from there.  It might be a bit busy, but I do like it better.  In this one the shading makes all the difference.  Before the shading, the word and the background was all a jumble to my eye.  As soon as I started adding the pencil for shading however, they started to break apart.

L-O-V-E
The V is inspired by the Missoni for Target ads that are all over the place.  I confess that I don't get all the excitement, but the pattern is certainly hard to ignore.


Tuesday, September 13, 2011

New Books!

I just got me newest Zentangle books! I got an Amazon gift card for my birthday and used it on some new books to feed my addiction.

I can't wait to get into them and see what new things I can learn.

I got the new edition of AlphaTangle by Sandy Steen Bartholomew, Zen Mandalas by Suzanne McNeill and Zenspirations by Joanne Fink. After just a peek in each book I can see there is a lot for me to learn and tons of inspiration!

Sorry that I have not provided any links for you but I'm using the blogger app and haven't figured out if I can do that here yet. Just look for the books on Amazon though. You'll find them without any problem. :)

Wednesday, September 7, 2011

Happy Birthday Friend!

This year I turn 40 as do many of my friends.  To mark the occasion many of us have thrown ourselves a birthday party.  I love it.  It has been great to be with my wonderful friends and to celebrate this milestone with each other.  I also love that almost all of them will be 40 before me.  ;)

For my friend Steph's birthday, I decided that I would make her a Zentangle.  I chose to do one in a 5X7 size.  I waited until the last minute and wanted to use a standard size to make the VERY last minute framing go smoothly.  I totally lucked out on the framing as they not only had one I liked, but Michael's was having a BOGO sale on the frame that I liked.  I should have bought more as when I went back the sale was over.  Oh well, I'll have to keep an eye out for next time they have one.  I know know what frames to pick up.

Happy Birthday Steph!  I love you my awesome friend!

Steph's tangle unframed


All framed up.  The edges were lost as I didn't leave enough room but, I don't think that it looks too bad.


Better Than a Pair of Ducks

This week the challenge from The Diva and Maria of Zentangle is to create a tile using only one tangle: Paradox.  What I love most about Paradox is that it looks so very complicated when you see it, but actually creating Paradox it really quite simple.  Hey! I bet that is why the tangle is called Paradox.  (Wow, am I quick.)  I have tried a tile or two using just Paradox before and while I've been perfectly happy with them, I wanted to try something new.  I had wondered what they triangles of Paradox would look like when attaching the points in the center, like a Trivial Pursuit game piece,  but have not tried it before.  So, when I saw this weeks challenge, I decided to go for it.

I started with the main grouping in the center and then added those at the edge.  After I got them all filled in, I liked the tile well enough, but thought there was far too much empty space.  I thought about just blacking out the white but then I changed my mind.  I was afraid that the Paradox would get lost.  I decided to add another triangle to the "circles" to connect them all together.  I like how it turned out.  It sort of looks like a complicated piece of jewelry.

I have another tile that I started before this one but I didn't like where it was going.  If I finish it, I'll post it here later.

Wednesday, August 31, 2011

Butterflies!

While working on my housewarming piece for my friend, I kept looking at the butterflies.  I really like them in that piece.  Plus, butterflies!  So, I decided that I was going to work on a series of them.  I have another friend that has a series of snowflakes at her house that are lovely.  Hers are photographs but are small squares that are framed very simply.  They look great in a grid on her wall.

So far I have done two.  I decided to add a color to the bodies.  So far I have silver and gold but will try some of the gel pens that I have gotten for the following drawings.  I really like the two so far.  They are light and elegant, to me anyway.  I'd love to hear what you think!


Silver Butterfly


Gold Butterfly


Kiss My Grids!

The challenge this week from The Diva is to create our tangle using only grid patterns.  I love the grid patterns.  Grids help me to stay evenly spaced.  I like even patterns.  I think it is because the freehand patterns tend to intimidate me a bit.

Every time I think of the name of this challenge, I can hear the actress on "Alice" saying "Kiss my grits!"  Then I am thinking of grits and want to make some.  I know that grits aren't for everyone but they are certainly for me.  I grew up in Tennessee and a full breakfast is not complete without them.  When we were on vacation I had Grits and Fried Green Tomato Napoleon with fresh Gulf Shrimp.  SO GOOD!  Anyone who doesn't like grits, I think it is because you have not had good ones.  Cheese grits are divine and all grits should be creamy and loaded with butter. :)

So, on to the grids.  I'm getting hungry here.  My first go at the challenge I did on the back of a note card.  A friend recently got married and brought me her old note cards to tangle on.  I have been using them for doodles and practice but thought I'd see how they work on a "real" tangle.  The paper did well.  There may be more this size in the future.  Using the theme of the challenge for inspiration, I used a mouth as a string.  Then the idea of grits are there in the gingham pattern.  I think of gingham as a "southern" pattern.  I used my own Huggybear pattern in the background. I skipped the little white dots this time.


I wanted to do a tangle for this challenge that was different , so I tried again.  This time I used 3.5" square of watercolor paper and gridded the whole thing.  I wasn't sure what to do for a string so I just looped around and ended up with this popcorn looking shape.  I used Eye-Wa for the background and a dressed up Bales as the center.  Bales looks like Puff though.  I have been wanting to learn Puff but the center squares keep me away so maybe I'll try Bales this way when I want to make Puff.  I hope you enjoy them.  I can't wait to see more of what you all have done!

Monday, August 22, 2011

Housewarming

I have a friend who loves nature and has just bought a new house.  While I haven't seen her new house yet, I think that she has more wall space than at her old house so I decided to make her some art!  Hopefully she will enjoy it. 

This piece was my biggest one yet.  At 12" X 18", it took a little wile to finish.  It was inspired by an album cover from one of Erik Friedlander's albums.  Since I used a standard size, I was able to find a really nice frame at Michael's right off the shelf.

I plan on giving it to her this weekend. 

The finished piece in it's frame.


A little closer look at the piece.


Assunta - Challenge # 36

When the Zentangle email arrived last week, I knew a new tangle was waiting for me.  I was excited that there was a new tangle to learn and also glad that it came after the weekly challenge had been posted.  I like having a little time to play and work out a new tangle.  At first, Assunta looked like it might be too complicated for me.  But then I realized that Assunta would always be too complicated if I never tried it out.  Boy am I glad that I did.  I start with a penciled grid so that my lines are evenly spaced. My curves aren't so uniform but I didn't do too badly I think.

I really like the possibility of variation with Assunta.  It can be dark if you need dark, or light when you need light.  Lots of places to add texture as well which is nice.  I enjoyed working with it and look forward to using it again soon!  Thanks Rick for making it up.  Happy Belated Birthday to Maria!

Friday, August 19, 2011

Time out for a photo or two.

Part of the reason I have been distracted in the last month is that I was participating in the SoFoBoMo (Solo Photo Book Month for short.)  Like the writing challenge that you may have heard of, this gives a photographer one month to take photos and create a PDF book.  Check out their website for more details.  If you love photos this is a fun challenge.  You don't need a fancy camera, I've seen some great iPhone photo books, or fancy anything.  Just the time, the desire and BAM! you're there.

I share mine with you here.  While you are on the site, check out some of the other books too.  There are some super talented people out there.  You can download the books as well if there is one that tickles your fancy.

Tile on a Tile - Challenge 35

It feels like forever since I've blogged and posted!  I was visiting family for two weeks and got out of the swing of things.  I think that I'm almost back though and to prove it, I have done and will post this weeks challenge in a timely fashion!

This week The Diva's challenge was guest hosted by Margaret Bremner of http://www.enthusiasticartist.blogspot.com/.  I loved Margaret's challenge tiles and thought they looked so wonderful!  It was fun to play with the thickness of the border.  Something that I think I shall keep in mind for the future.

So, as it is late and I'm still feeling rusty, I will get to the reason you are here, my tile...

I hope that you like it!

Tuesday, August 9, 2011

I've been away

Sorry I haven't posted anything in a while.  My family and I were away on our summer vacation and my plan of tangling while on the road didn't pan out as I thought it would.

This vacation was a chance to get away and for me to work on my photo book project.  This is a yearly challenge by the great folks at SoFoBoMo.  Hit the link and see what great photo books people are making around the world.  You can see mine here.  I am still working on my PDF for the SoFoBoMo site.  I'm running into more of an issue than I did last year.  I still have a week to get it figured out though.  I sure wish I remember how I did it last year....

Anyway, I'm working on this week's challenge.  I hope to have it up tomorrow but I also have to do some back to school shopping.  Yikes!  It's almost time to send the oldest back and the youngest off to pre-school.

I hope you are having a great week and I'll post again soon!

Tuesday, July 12, 2011

Challenge 30

This week the challenge is guest hosted by Christina Vandervlist.  She has us using our initials as strings.  I do this quite a bit as sometimes I'm at a loss of where to start.  If I'm making a tangle for someone, I'll use there initial as a starting point. 

As my initials are JL, I used cursive letters to add more interest to the shapes in the string.  I was afraid that JL on top of each other would look like an inverted T.  I tried some new tangles on this challenge and maybe developed a new one.  I'm still tweaking it and need to come up with a name.  :)

J and L over one another.  Lots of loops!

All done!  I had to fight myself to make sure I didn't fill in every space.

Monday, July 4, 2011

String Theory v. IV - Diva's Challenge 29

Happy 4th of July to all you Americans out there!  Happy new challenge Monday to everyone else!

This week I got to do the challenge in wonderful quiet as my Husband and sons headed off this morning to go camping.  It's amazing how much quicker I can get this done without being pulled to do something else every 15 minutes or so.  :)  Because they are off camping, Husband took my camera so please forgive the poor quality of the photos.  Yea for iPhone cameras though!

I thought the idea of using an actual string to make the string for the challenge this week was a super idea.  I may have to try this on larger pieces.  I am always perplexed when doing a large ZIA on the best way to divide up the space.  Using an actual string will be a nice way to solve that I think. 


 I used my son's yoyo as my string.  It already had a weight attached. 

I laid down the yoyo as I knew that I wanted part of the circle in the tangle but not all of it (the yoyo is a bit large) so I set it in the corner and draped the string on the tile.  This is the first draping and I thought it looked good, so I went with it.


Next, I traced around the edge of the yoyo and followed the string around with the pencil.


 I used the die to pick my tangles this time.  Lucky for me, the die chose some of my favorites.  :)  Blogger is giving me a hard time this morning and uploading this tile on it's side.  I know there really is no top of bottom, but I like this tile with the tipple in the bottom left corner.
So, thanks to the Diva for another great challenge and thanks to my family for going camping.